How to Fix a Leaky Bathroom Faucet Drain: A Comprehensive Guide
A leaky bathroom faucet drain can be a nuisance, causing water damage, increased water bills, and unpleasant odors. Fixing the issue is crucial to prevent these problems and maintain the integrity of your bathroom. This article provides a comprehensive guide on how to fix a leaky bathroom faucet drain effectively.
Identifying the Faucet Drain Type
Before attempting any repairs, it's essential to identify the type of faucet drain you have. The two most common types are compression faucets and cartridge faucets.
- Compression faucets: These faucets have a handle that screws down onto a washer to create a watertight seal. The washer can wear out over time, causing a leak.
- Cartridge faucets: These faucets have a single handle that controls both the water flow and temperature. Inside the cartridge, a rubber or ceramic disc seals against the body of the faucet to prevent leaks.
Tools and Materials
Once you've identified the faucet drain type, gather the following tools and materials:
- Adjustable wrench
- Phillips head screwdriver
- Replacement washer (for compression faucets)
- Replacement cartridge (for cartridge faucets)
- Plumber's putty
- Rags or towels
Step-by-Step Repair Instructions
Compression Faucets
- Turn off the water supply to the faucet.
- Open the faucet to release any remaining water.
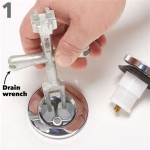
- Using the adjustable wrench, loosen the packing nut located at the base of the handle.
- Remove the handle and the stem washer behind it.
- Replace the worn washer with a new one.
- Reassemble the faucet by tightening the packing nut and handle.
Cartridge Faucets
- Turn off the water supply to the faucet.
- Open the faucet to release any remaining water.
- Remove the handle by unscrewing the set screw or pulling it off.
- Use the Phillips head screwdriver to remove the cartridge cap.
- Pull the cartridge out of the faucet body.
- Replace the old cartridge with a new one.
- Reassemble the faucet by installing the cartridge cap and handle.
Additional Considerations
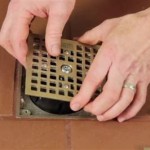
- Check the gasket at the base of the faucet: If the gasket is worn or damaged, it can cause a leak. Replace it with a new one.
- Use plumber's putty: Apply a ring of plumber's putty around the base of the faucet before installing it to create a watertight seal.
- Test the faucet: Once you've completed the repair, turn on the water supply and check for any leaks. If the leak persists, you may need to tighten the connections further or call a professional plumber.
Conclusion
Fixing a leaky bathroom faucet drain can be a simple and rewarding task. By following the instructions outlined in this guide, you can effectively stop leaks and restore the functionality of your bathroom faucet. If you encounter any difficulties or the leak persists, do not hesitate to seek professional assistance from a qualified plumber.

Bathroom Sink Drain Leaking Around Threads Premier Plumbing Inc

New Bathroom Sink Drain Leaks At Threads

How To Fix A Leaking Bathroom Sink Paschal Air Plumbing Electric

Bathroom Sink Drain Leaking Around Threads Premier Plumbing Inc

How To Fix Bathroom Sink Drain Leaks Underneath Gasket Threads Solved

Loose And Leaking Plastic Bathroom Sink Drain Repair

Loose And Leaking Plastic Bathroom Sink Drain Repair

Bathroom Sink Drain Leak Not Sure How To Fix Doityourself Com Community Forums

Properly Fixing A Leaky Sink Faucet Wallside Windows

Bathroom Sink Popup And Stopper Problems
Related Posts