How to Fix a Leaky Bathroom Sink Faucet with a Single Handle
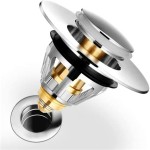
How To Fix A Leaky Bathroom Sink Faucet Single Handle is a phrase composed of nouns and verbs. The noun 'faucet' refers to the plumbing fixture that controls the flow of water, while 'handle' refers to the lever or knob used to operate the faucet. The verb 'fix' implies the action of repairing or resolving a problem. Together, these words form a phrase describing the process of addressing a leak in a single-handle bathroom sink faucet. This article will provide a comprehensive guide to the essential aspects of fixing a leaky bathroom sink faucet with a single handle. Understanding these aspects is crucial for successful repair and preventing further damage to the faucet or surrounding fixtures. ### Identifying the Source of the Leak The first step in fixing a leaky faucet is identifying the source of the leak. Common areas where leaks occur include: -O-rings
: These rubber seals form a watertight barrier between the faucet handle and the faucet body. -Washer
: A washer is a small disc located inside the faucet handle that prevents water from escaping when the faucet is turned off. -Cartridge
: A cartridge is a cylindrical component that controls the flow and temperature of water in single-handle faucets. ### Tools and Materials Required Before beginning repairs, gather the necessary tools and materials: - Adjustable wrench or pliers - Screwdriver (Phillips or flathead) - Replacement O-rings or washer (if necessary) - Lubricant (optional) ### Step-by-Step Repair Instructions1. Turn off the Water Supply
Begin by turning off the water supply valves located under the sink. This will prevent water from flowing while you are working.2. Remove the Handle
Use an adjustable wrench or pliers to loosen the screws holding the handle in place. Once loose, pull the handle straight up to remove it.3. Replace the O-ring or Washer
Inspect the O-ring or washer for damage or wear. If damaged, replace it with a new one. Lubricate the new O-ring before installing it.4. Reinstall the Handle
Place the handle back onto the faucet body and tighten the screws to secure it.5. Turn on the Water Supply
Turn the water supply valves back on and check if the leak has been fixed. ### Additional Tips - If replacing the O-ring or washer does not resolve the leak, the problem may lie with the cartridge. Replacing the cartridge is a more complex repair that may require professional assistance. - If the leak persists or you encounter any other issues, it is advisable to consult with a licensed plumber for further diagnosis and repair. ### Conclusion By addressing the essential aspects discussed in this article, you can effectively fix a leaky bathroom sink faucet with a single handle. Remember to identify the source of the leak and use the appropriate tools and materials to complete the repair. If the leak persists or you encounter any difficulties, do not hesitate to seek professional assistance.
How To Fix A Leaky Single Handle Sink Faucet

How To Replace Repair A Leaky Moen Cartridge In Bathroom Set Of Faucets Single Lever Tips

How To Fix A Leaky Single Handle Sink Faucet

How To Fix A Leaky Bathroom Sink Faucet

How To Rebuild A Delta Single Handle Faucet

How To Fix A Leaky Single Handle Sink Faucet

How To Fix A Leaky Single Handle Sink Faucet

How To Fix A Leaky Faucet True Value

How To Fix A Dripping Or Leaky Single Handle Faucet

How To Fix Moen Single Handle Faucets
Related Posts