How to Fix a Leaky Bathroom Sink Valve
Leaking bathroom sink valves are a common problem that can waste water and increase your water bill. Fortunately, they are relatively easy to fix with a few simple tools. In this article, we will discuss the essential aspects of fixing a leaky bathroom sink valve.
The part of speech of the keyword "How To Fix A Leaky Bathroom Sink Valve" is a noun phrase. This noun phrase refers to a set of instructions on how to repair a leaking bathroom sink valve. The essential aspects of this topic include identifying the type of valve, gathering the necessary tools and materials, and following the steps to repair the valve.
Identifying the Type of Valve
The first step in fixing a leaky bathroom sink valve is to identify the type of valve. There are two main types of valves: compression valves and cartridge valves. Compression valves are the most common type of valve and are typically found in older homes. Cartridge valves are newer and are found in most newer homes.
Gathering the Necessary Tools and Materials
Once you have identified the type of valve, you will need to gather the necessary tools and materials. For compression valves, you will need a wrench, a screwdriver, and a new washer. For cartridge valves, you will need a wrench and a new cartridge.
Following the Steps to Repair the Valve
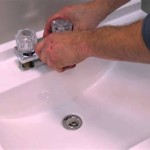
Once you have gathered the necessary tools and materials, you can begin to repair the valve. The steps for repairing a compression valve are as follows: 1. Turn off the water supply to the sink. 2. Open the faucet to release any remaining water. 3. Remove the packing nut using a wrench. 4. Remove the stem washer and replace it with a new one. 5. Reinstall the packing nut and tighten it using a wrench. 6. Turn on the water supply and check for leaks. The steps for repairing a cartridge valve are as follows: 1. Turn off the water supply to the sink. 2. Open the faucet to release any remaining water. 3. Remove the handle using a screwdriver. 4. Remove the cartridge using a wrench. 5. Replace the cartridge with a new one. 6. Reinstall the handle and tighten it using a screwdriver. 7. Turn on the water supply and check for leaks.
Conclusion
By following the steps outlined in this article, you can easily fix a leaky bathroom sink valve. This will save you money and help to prevent water damage.

How To Replace A Leaking Shutoff Valve Under Sink

How To Fix A Leaky Faucet True Value

Few Know This Easy Trick To Stop Leaking Valves Instantly

How To Repair A Leaking Sink Shut Off Valve Doityourself Com

Leaking Shut Off Valve Under Sink Faucet How To Fix A Leaky Quickly

Leaky Sink Valve After Replacing Doityourself Com Community Forums

Fix A Leaky Shut Off Valve Home Repair Diy Plumbing

How To Fix A Leaking Bathtub Faucet Diy Family Handyman

Bathroom Faucet Is Leaking Or Dripping

How To Fix A Leaking Bathroom Faucet Quit That Drip