Essential Aspects of Fixing a Loose Bathroom Faucet Single Handle
A loose bathroom faucet single handle can be an annoying and potentially costly problem. If left unattended, it can lead to leaks, water damage, and increased water bills. Fortunately, fixing a loose faucet handle is a relatively simple task that can be completed in a few minutes with the right tools and materials.
Identifying the Loose Handle
The first step in fixing a loose faucet handle is to identify the type of faucet. There are two main types of faucets: single-handle faucets and two-handle faucets. Single-handle faucets have one handle that controls both the hot and cold water, while two-handle faucets have separate handles for hot and cold water. Once you have identified the type of faucet, you can proceed with the repair process.
Tools and Materials Required
To fix a loose bathroom faucet single handle, you will need the following tools and materials:
- Phillips head screwdriver
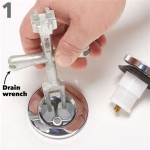
- Adjustable wrench
- Replacement cartridge (if necessary)
Step-by-Step Repair Instructions
Follow these step-by-step instructions to fix a loose bathroom faucet single handle:
1. Turn off the water supply. Locate the shut-off valves under the sink and turn them off. This will prevent water from flowing out of the faucet while you are working on it. 2. Remove the handle. Use a Phillips head screwdriver to remove the screws that hold the handle in place. Once the screws are removed, the handle should come off easily. 3. Inspect the cartridge. Once the handle is removed, you will see the cartridge. The cartridge is the part of the faucet that controls the flow of water. Inspect the cartridge for any signs of damage or wear. If the cartridge is damaged, it will need to be replaced. 4. Tighten the packing nut. If the cartridge is not damaged, the next step is to tighten the packing nut. The packing nut is located at the base of the cartridge. Use an adjustable wrench to tighten the packing nut until it is snug. Do not overtighten the packing nut, as this could damage the cartridge. 5. Reinstall the handle. Once the packing nut is tightened, you can reinstall the handle. Align the handle with the cartridge and insert the screws. Tighten the screws until the handle is secure. 6. Turn on the water supply. Once the handle is reinstalled, turn on the water supply and check for leaks. If there are no leaks, the repair is complete.Tips for Prevention
To prevent a loose bathroom faucet single handle in the future, follow these tips:
- Do not use excessive force when turning the handle.
- If the handle becomes loose, tighten it immediately.
- Replace the cartridge every few years to prevent wear and tear.
By following these tips, you can keep your bathroom faucet single handle working properly for many years to come.

How To Tighten Faucet Handle Homeserve Usa

Tighten A Loose Lever On Moen Brantford Faucet

How To Repair A Single Handle Kitchen Faucet Diy Family Handyman

Mazz Kitchen Sink Faucet Loose Handle

Tighten A Loose Lever On Moen Brantford Faucet

How To Fix A Leaky Single Handle Sink Faucet

How To Fix A Loose Bath Tub Faucet Handle Ifixit Repair Guide

Tighten Loose Faucet Handle And Base Moen Kitchen Bathroom

How To Fix A Loose Faucet Storables

How To Tighten A Bathroom Faucet Handle
Related Posts