How to Fix a Bathroom Sink Handle: A Comprehensive Guide
A leaky or malfunctioning bathroom sink handle can be a frustrating inconvenience. But with a few simple tools and clear instructions, you can restore your sink to pristine condition. Follow this comprehensive guide to learn how to fix a bathroom sink handle efficiently and effectively.
Identifying the Problem
Before attempting repairs, determine the type of handle you have. Single-lever handles control both hot and cold water with one lever, while two-handle faucets have separate handles for each. Additionally, identify the type of cartridge or valve used in your faucet. These components control the water flow and may require specific parts for replacement.
Tools and Materials
Gather the necessary tools and materials for the repair. These may include a wrench, hex key, pliers, screwdriver, and replacement cartridge or valve if needed. Ensure you have the correct size and type of tools for your specific faucet model.
Step-by-Step Instructions
For Single-Lever Handles
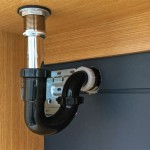
Turn off the water supply valves under the sink. Loosen the cap at the handle's base using a wrench. Remove the handle and set it aside. Use pliers to remove the cartridge retaining nut, then pull out the cartridge. Inspect the cartridge for damage or debris. Replace it with a new cartridge if necessary. Reassemble the handle in reverse order.
For Two-Handle Faucets
Turn off the water supply valves under the sink. Loosen the screw on the handle with a screwdriver or hex key. Remove the handle and set it aside. Use pliers to unscrew the compression nut holding the valve in place. Pull out the valve and inspect its seat for damage or wear. Replace the valve if necessary. Replace the valve and compression nut, then reassemble the handle.
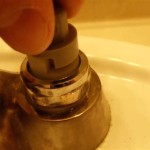
Replacing the Cartridge or Valve
If the cartridge or valve needs replacing, ensure you purchase the correct model for your faucet. Carefully remove the old component and insert the new one. Tighten the retaining nut or compression nut securely. Reassemble the handle and test the faucet to ensure it operates smoothly.
Troubleshooting Tips
If the handle still leaks or malfunctions after repairs, consider the following troubleshooting tips:
- Check for leaks at the base of the handle or valve.
- Inspect the O-rings or gaskets for damage and replace them if necessary.
- Ensure the cartridge or valve is securely tightened.
- If water leaks from the spout when the handle is off, the washer or seal may need replacing.
By following these steps and troubleshooting tips, you can effectively fix a bathroom sink handle and restore your sink to proper working order. Remember, always consult a professional plumber if the problem persists or if you have any safety concerns.

How Do I Replace Bathroom Sink Faucet Handles Cleaning More

How To Tighten A Bathroom Faucet Handle

Diy How To Replace A Bathroom Sink Faucet Remove Install

How To Tighten Faucet Handle Homeserve Usa

How To Fix A Leaky Faucet True Value

How To Remove And Install A Bathroom Faucet

Bathroom Faucet Handles Loose Wobbly Diy Fix

How To Fix A Stripped Faucet Handle In 10 Minutes Or Less

How To Repair A Single Handle Kitchen Faucet Diy Family Handyman

How To Replace Bathroom Sink Faucet Handles Ehow
Related Posts