How to Install a Moen 2 Handle Bathroom Faucet
Installing a new bathroom faucet can be an easy and rewarding DIY project. With the right tools and a little bit of patience, you can have a new, updated faucet in no time. In this article, we'll walk you through the steps on how to install a Moen 2 handle bathroom faucet.
Tools and Materials you'll need:
- Moen 2 handle bathroom faucet
- Adjustable wrench
- Phillips screwdriver
- Pliers
- Plumber's putty
- Faucet mounting nuts
- Basin wrench
- Tape measure
- Level
Step-by-Step Instructions:
Step 1: Turn Off the Water Supply
Before you start working on the faucet, make sure to turn off the water supply to the bathroom. There should be two shut-off valves under the sink. Turn both of them clockwise to close them.
Step 2: Remove the Old Faucet
Use the adjustable wrench to loosen the nuts that hold the old faucet in place. Once the nuts are loose, you can lift the old faucet off the sink.
Step 3: Clean the Sink Surface
Once the old faucet is removed, clean the sink surface where the new faucet will be installed. Remove any old plumber's putty or debris.
Step 4: Apply Plumber's Putty
Apply a bead of plumber's putty around the base of the new faucet. This will help to create a watertight seal.
Step 5: Install the Mounting Nuts
Thread the faucet mounting nuts onto the faucet shanks. Hand-tighten the nuts as much as possible.
Step 6: Position the Faucet
Place the faucet in the desired position on the sink. Use a level to make sure that the faucet is level.
Step 7: Tighten the Mounting Nuts
Use the adjustable wrench to tighten the mounting nuts. Be careful not to overtighten the nuts, as this could damage the faucet.
Step 8: Connect the Water Supply Lines
Use the basin wrench to connect the water supply lines to the faucet. Make sure that the hot and cold water lines are connected to the correct sides of the faucet.
Step 9: Test the Faucet
Turn on the water supply and check for leaks. If there are any leaks, tighten the nuts or adjust the plumber's putty accordingly.
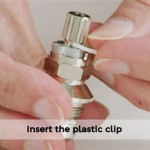
Step 10: Install the Handles
Install the faucet handles by inserting them into the stems and tightening the screws.
Your new Moen 2 handle bathroom faucet is now installed and ready to use. Enjoy your updated bathroom!
How To Install A Moen Centerset Faucet

How Do I Replace My Moen Bathroom Faucet Cartridge

Moen 2 Handle Replacement Cartridge 1224 The Home Depot

Moen Eva 8 In Widespread 2 Handle Bathroom Faucet Trim Kit Brushed Nickel Valve Included T6420bn 9000 The Home Depot

How To Fix A Dripping Moen Faucet Howtolou Com

T990 By Moen Cau Chrome Two Handle Low Arc Roman Tub Faucet Studio41

Moen Brantford 8 In Widespread 2 Handle High Arc Bathroom Faucet Trim Kit Oil Rubbed Broe Valve Included T6620orb 9000 The Home Depot

How To Remove Moen Bathroom Faucet Handle In 2 Steps

Moen Wetherly Spot Resist Brushed Nickel Widespread 2 Handle Watersense Bathroom Sink Faucet With Drain In The Faucets Department At Com

Moen Adler Double Handle Low Arc 4 In Centerset Bathroom Sink Faucet Watersense Certified Chrome Canadian Tire
Related Posts