How to Install a Moen Bathroom Faucet
Installing a new bathroom faucet can be a simple and rewarding DIY project. By following these step-by-step instructions, you can easily upgrade your bathroom's style and functionality.
Materials and Tools Required:
- Moen bathroom faucet
- Adjustable wrench
- Phillips head screwdriver
- Pliers
- Plumber's putty
- Teflon tape
- Basin wrench
Step-by-Step Instructions:
1. Turn Off Water Supply and Drain Pipes
Start by turning off the water supply to the bathroom faucet. Find the shut-off valves located under the sink or behind the toilet and turn them clockwise to close them. Open the faucet handles to allow any remaining water to drain out.
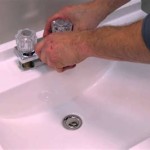
2. Disconnect Old Faucet
Using an adjustable wrench, loosen the nuts securing the supply lines to the old faucet. Disconnect the supply lines and set them aside. Next, use the screwdriver to remove the screws holding the faucet in place and carefully lift it off the sink.
3. Inspect and Clean the Base
Thoroughly clean the surface where the new faucet will be installed. Remove any old sealant or debris. Apply a thin layer of plumber's putty around the base of the faucet.
4. Install the Pop-Up Assembly (if applicable)
If your faucet includes a pop-up drain assembly, insert the drain body into the drain hole and tighten the locknut from underneath the sink using pliers.
5. Install the Faucet Body
Position the faucet body over the sink and carefully align the mounting holes. Insert the mounting studs and secure them with washers and nuts using the screwdriver.
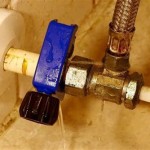
6. Wrap Supply Lines with Teflon Tape
Measure and cut two supply lines to the correct length. Wrap several layers of Teflon tape clockwise around the threaded ends of the supply lines to ensure a watertight seal.
7. Connect Supply Lines to Faucet
Connect the hot and cold supply lines to the corresponding ports on the faucet body. Hand-tighten the nuts and use the adjustable wrench to further tighten them by a quarter-turn.
8. Turn on Water Supply and Check for Leaks
Slowly turn on the water supply and check for leaks at all connections. Tighten any loose nuts or fittings as needed. If there are no leaks, continue with the following steps.
9. Install Handles (if applicable)
Insert the faucet handles onto the valve stems and secure them with screws or set screws. Make sure the handles are pointing in the correct direction.
10. Finishing Touches
Wipe down the faucet with a damp cloth to remove any fingerprints or smudges. Enjoy your new and stylish bathroom faucet!
Tips:
- Choose a faucet that fits the style and functionality of your bathroom.
- Use a level to ensure the faucet is installed evenly.
- Do not overtighten the nuts and fittings, as this can damage them.
- If you encounter any difficulties, do not hesitate to consult a qualified plumber.
- Regularly clean and maintain your faucet to keep it functioning properly.

How To Install A Moen Centerset Faucet

Install Moen Bathroom Sink Faucet And Drain

Diy How To Install The Moen Boardwalk Faucet Redhead Mom

How To Install A Bathroom Faucet Moen Adler

How To Install Moen Widespread Bathroom Faucets

How To Install Bathroom Faucet And Drain Moen Adler Collection

How To Install A New Bathroom Faucet In Pedestal Sink Moendiyer Simply Designing With Ashley

How To Remove Moen Bathroom Faucet Handle In 2 Steps

How To Install Moen Bathroom Faucet

How To Install A Bathroom Faucet Artsy Fartsy Mama
Related Posts