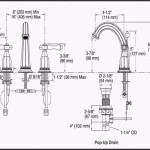
How to Install a Moen Two-Handle Bathroom Faucet
Installing a Moen two-handle bathroom faucet is a relatively simple task that can be completed in a few hours. However, it is important to carefully follow the instructions to ensure that the faucet is installed correctly and without leaks. This article will provide you with step-by-step instructions on how to install a Moen two-handle bathroom faucet.
Before you begin, you will need to gather the following tools and materials:
- Moen two-handle bathroom faucet
- Wrench
- Plumber's putty
- Teflon tape
- Basin wrench
- Screwdriver
- Bucket
Once you have gathered the necessary tools and materials, you can begin the installation process. The first step is to turn off the water supply to the bathroom sink. To do this, locate the shut-off valves under the sink and turn them clockwise until the water is completely turned off. Once the water supply is turned off, you can proceed to the next step.
The next step is to remove the old faucet. To do this, use a wrench to loosen the nuts that hold the faucet in place. Once the nuts are loose, you can pull the faucet up and out of the sink.
Once the old faucet is removed, you can begin installing the new Moen faucet. The first step is to apply a bead of plumber's putty to the underside of the faucet base. The plumber's putty will help to create a seal between the faucet and the sink.
Once the plumber's putty is applied, you can place the faucet base over the sink hole. Be sure to align the faucet base with the holes in the sink. Once the faucet base is in place, you can tighten the nuts that hold it in place.
The next step is to install the faucet handles. To do this, insert the handles into the holes in the faucet body. Once the handles are in place, you can tighten the screws that hold them in place.
The final step is to connect the water supply lines to the faucet. To do this, wrap the threads of the water supply lines with Teflon tape. Once the Teflon tape is applied, you can screw the water supply lines into the faucet body. Be sure to tighten the water supply lines securely.
Once the water supply lines are connected, you can turn on the water supply to the bathroom sink. Once the water is turned on, check for leaks. If there are any leaks, tighten the nuts or screws that hold the faucet in place.
Congratulations! You have now successfully installed a Moen two-handle bathroom faucet.

How Do I Replace My Moen Bathroom Faucet Cartridge

How To Install A Moen Centerset Faucet

How To Fix A Dripping Moen Faucet Howtolou Com

Tighten A Loose Lever On Moen Brantford Faucet

Installation S By Moen

Installation S By Moen

Moen Eva 4 In Centerset 2 Handle High Arc Bathroom Faucet Chrome 6410 The Home Depot

Moen Eva 8 In Widespread 2 Handle Bathroom Faucet Trim Kit Chrome Valve Included T6420 9000 The Home Depot

Moen 2 Handle Replacement Cartridge 1224 The Home Depot

Moen Brantford 8 In Widespread 2 Handle High Arc Bathroom Faucet Trim Kit Chrome Valve Not Included T6620 The Home Depot
Related Posts