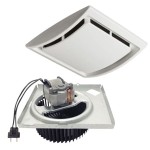
How to Install a Bathroom Fan in a Drop Ceiling
Installing a bathroom fan in a drop ceiling is a relatively straightforward project that can improve air quality, reduce moisture, and prevent mold growth. This article will guide you through the process step by step. Before you begin, ensure you have the necessary tools and materials, and always prioritize safety by disconnecting power to the area.
Step 1: Plan and Prepare
Start by determining the fan's location. Ideally, it should be positioned above the shower or bathtub to ensure proper ventilation. Measure the ceiling opening needed for the fan housing. Next, gather the required tools and materials. This may include:
- A bathroom fan with a built-in blower and a vent termination kit
- A drop-ceiling tile cutter or utility knife
- A screwdriver
- Wire strippers
- Electrical tape
- A level
- A stud finder
- Safety goggles
- Work gloves
Turn off the power to the circuit that will power the fan. Double-check the power is off using a voltage tester.
Step 2: Cut the Ceiling Opening
Using a drop-ceiling tile cutter or a utility knife, carefully cut out a square or rectangular opening in the ceiling tile that accommodates the fan housing. Be precise to ensure the fan fits snugly. A drop-ceiling tile cutter typically provides cleaner, more precise cuts than a utility knife.
Step 3: Prepare the Wiring
Locate the nearest electrical junction box. If you are connecting the fan to an existing electrical outlet, you will need to run new wiring from the junction box to the fan location. If you are installing a new circuit, consult with an electrician to ensure proper wiring and safety protocols are met.
With the power off, connect the fan's wiring to the junction box's wires. Use wire nuts to securely connect the wires. Most bathroom fans come with instructions detailing the wiring connections. Ensure you connect the ground wire, neutral wire, and hot wire to the corresponding wires in the junction box.
Step 4: Install the Fan
Position the fan housing in the cut opening you created. Ensure that the housing is level and centered. If the housing is not perfectly level, you may need to adjust the suspension clips or use shims to level the housing. Once the fan housing is positioned, attach it to the ceiling grid.
Step 5: Install Vent Termination
Connect the fan's vent to the vent termination kit. This kit directs the air outside. It typically includes a louver, which prevents insects and debris from entering the vent. Install the vent termination kit according to the manufacturer's instructions.
Step 6: Connect the Fan to Power
After installing the fan, connect the fan to power. Double-check that the wiring connections are secure and properly insulated. Next, check for a proper ground connection. Once the wiring is secured, turn the power back on and test the fan to ensure it operates correctly.
Step 7: Clean Up and Final Checks
Once the fan is installed and working, clean up any debris or loose wires. Ensure the fan operates smoothly and quietly without any vibrations. If you hear any rattling noises, you may need to tighten the screws or adjust the fan's alignment.
Installing a bathroom fan in a drop ceiling is a worthwhile addition to any bathroom. By following these steps, you can improve your bathroom's ventilation and air quality. Remember to prioritize safety throughout the process. If you are unsure about any aspect of the installation, consult a qualified electrician.

How To Install A Bathroom Exhaust Fan Installation

How To Install Drop Ceiling Tiles For A Bathroom Diy Danielle

Venting A Bathroom Through Sips Fine Homebuilding

How To Install Drop Ceiling Tiles For A Bathroom Diy Danielle

How To Install A Bathroom Fan Step By Guide Bob Vila

Installing An Exhaust Fan During A Bathroom Remodel Greenbuildingadvisor

Faart Invento Recessed False Ceiling Fan With Led

How To Install A Ventilation Fan In Your Bathroom Kevin Szabo Jr Plumbing Services Local Plumber Tinley Park Il

Quick Guide On How To Install A Vent Fan In Bathroom

Broan Ultragreen Series Ventilation Fan Installation For Retrofit
Related Posts


