How to Install a Bathroom Vanity
Installing a bathroom vanity is a rewarding DIY project that can significantly upgrade your bathroom's aesthetics and functionality. It involves several steps, from preparing the space to connecting plumbing and attaching the countertop. While it might seem daunting, with careful planning and a methodical approach, you can successfully install your new vanity. This article outlines the essential steps involved in the process, providing clear instructions and helpful tips for a successful installation.
1. Preparation and Planning
Before embarking on the installation, careful preparation is key. The first step is to gather the necessary tools and materials. These include:
- A level
- A tape measure
- A pencil
- A drill
- Screwdrivers (Phillips and flathead)
- Wrench
- Plumbers' tape
- Safety glasses
- Work gloves
- A utility knife
- Caulk gun
- Silicone caulk
- Optional: A helper
Next, assess the existing plumbing and electrical connections. Determine if you need to adjust the plumbing lines or install a new electrical outlet for the vanity. If adjustments are needed, ensure you have the necessary tools and materials for the modifications.
Lastly, measure the space where the vanity will be installed and consider the size and shape of the vanity you have chosen. Ensure there is enough space for the vanity to fit comfortably, allowing for sufficient clearance for doors and drawers. Also, consider the location of the plumbing and electrical lines, ensuring they are accessible for connecting to the vanity.
2. Disconnecting and Removing the Old Vanity
If you are replacing an existing vanity, start by disconnecting the water supply and removing the old vanity.
1.
Turn off the water supply:
Locate the shut-off valve for the water supply to the bathroom vanity and turn it off. 2.Drain the water lines:
Open the faucet on the vanity to drain any remaining water from the lines. 3.Disconnect the water lines:
Use adjustable wrenches to disconnect the water lines from the vanity. If the connections are corroded or difficult to loosen, use a pipe wrench for better grip. 4.Disconnect the drain pipe:
Disconnect the drain pipe from the vanity. 5.Remove the vanity:
Carefully lift the vanity off the floor, disconnecting the plumbing lines and drain pipes as needed. You may need a helper for this step. 6.Remove the countertop:
If the vanity has a countertop, remove it by loosening the screws or clips holding it in place. 7.Clean the area:
Clean the floor and any residual debris from the old vanity.3. Installing the New Vanity
Once the old vanity is removed, you can proceed with installing the new vanity.
1.
Position the vanity:
Place the new vanity in the desired location, ensuring it is level and against the wall. 2.Attach the vanity to the wall:
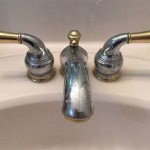
Use screws or brackets to secure the vanity to the wall. Follow the manufacturer’s instructions for specific attachment methods. 3.Connect the plumbing:
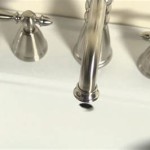
Connect the water supply lines to the vanity’s plumbing connections. Use plumber’s tape on the threads to ensure a watertight seal. 4.Connect the drain pipe:
Connect the drain pipe to the vanity’s drain outlet. Make sure the pipe is securely attached and slopes slightly towards the drain to prevent water from accumulating. 5.Attach the countertop:
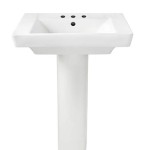
If the vanity has a countertop, attach it to the base following the manufacturer’s instructions. 6.Install the sink:
If the vanity comes with a sink, install it according to the manufacturer’s instructions. This typically involves attaching the sink to the countertop with clips or screws, and then sealing the area around the sink with silicone caulk.4. Finishing Touches
With plumbing and electrical connections complete, finalize the installation process by addressing the finishing touches.
1.
Caulking:
Apply silicone caulk around the edges of the vanity where it meets the wall to prevent water damage and create a clean finish. 2.Testing:
Turn on the water supply and test the vanity's functionality, checking for leaks or drainage issues. 3.Cleaning:
Clean the vanity and surrounding area to remove any debris or fingerprints.Installing a bathroom vanity may seem daunting, but with careful planning, preparation, and by following these steps, you can successfully complete the project. Remember to always refer to the manufacturer’s instructions for specific details about your vanity model for the best results.

How To Install A Bathroom Vanity

How To Install A Bathroom Vanity

How To Install Or Remove A Bathroom Vanity Homeserve Usa

12 Easy Steps To Install Bathroom Vanity And Sink

How To Replace Install A Bathroom Vanity And Sink Small Vanities Diy Tops

How To Install A Bathroom Vanity 4 Easy Steps

How To Install A Bathroom Sink Step By Guide

How To Install A Vanity Forbes Home

How To Install A Bathroom Vanity 101

Bathroom Sink Plumbing Installation
Related Posts