How to Install a Bathroom Vent Fan with Light
Proper ventilation is crucial for any bathroom, as it helps to remove moisture, odors, and pollutants from the air. Installing a bathroom vent fan with light is an effective way to improve ventilation and provide additional lighting. While the installation process might seem daunting, with the right tools and a few simple steps, you can easily DIY it.
Step 1: Gather Materials and Tools
Before you begin, gather the necessary materials and tools:
- Bathroom vent fan with light
- Screws
- Drywall saw
- Electrical wire
- Wire connectors
- Electrical tape
- Caulk gun
- Caulk
- Level
- Screwdriver
- Wire stripper
- Safety glasses
Step 2: Choose the Location
Determine the ideal location for the vent fan. It should be centered above the shower or bathtub, approximately 6 feet above the floor. Ensure there are no joists or studs blocking the desired path for the vent duct.
Step 3: Cut the Hole
Wear safety glasses and use a drywall saw to cut a hole in the ceiling for the vent fan. The hole should match the size of the fan housing. Refer to the manufacturer's instructions for precise measurements.
Step 4: Wire the Fan
Turn off the electricity at the breaker panel. Connect the electrical wire to the fan's wiring according to the color-coding scheme (black wire to black, white wire to white, and ground wire to green or bare copper). Use wire connectors and electrical tape to secure the connections.
Step 5: Install the Fan
Carefully insert the fan housing into the hole you cut. Secure it using the provided screws. Use a level to ensure that the fan is installed evenly.
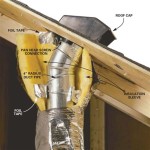
Step 6: Connect the Duct
Attach one end of the flexible duct to the exhaust port of the fan and the other end to a vent cap or roof vent. Use duct tape to seal the connections.
Step 7: Seal Around the Edges
Apply a generous bead of caulk around the edges of the fan and the ceiling. This will create an airtight seal and prevent air leaks.
Step 8: Turn on the Power
Turn the power back on at the breaker panel. Test the fan and light to ensure they are working properly.
Tips for Effective Ventilation
- Run the vent fan during and after showers or baths to remove excess moisture.
- Consider using a bath vent fan with a built-in humidity sensor that automatically turns on when the humidity level rises.
- Make sure the vent duct is unobstructed and has ample airflow to the outside.
- Regularly clean the vent fan housing and grill to maintain optimal performance.
Safety Precautions
- Always turn off the electricity before working on any electrical wiring.
- Wear safety glasses and gloves to protect yourself from debris and injury.
- Use caution when cutting into the ceiling to avoid damaging existing electrical wires or plumbing.
- Ensure proper ventilation and lighting in the work area.

Install A New Bathroom Vent Fan Light

How To Install A Bathroom Fan Step By Guide Bob Vila

How To Install A Bathroom Fan Diy Family Handyman

How To Put Bath Fan And Light On Separate Switches Instead Of One Switch

Bathroom Exhaust Fan Light

How To Install A Bathroom Fan With Bluetooth Speakers Fixthisbuildthat

How To Add Exhaust Fan Heater Light Fixture Combination

I M Trying To Install A New Bathroom Fan Light And Night Combo The Old Switch Box Was Double Gang With

Installing An Exhaust Fan During A Bathroom Remodel Greenbuildingadvisor

How To Install A Bathroom Fan Step By Guide Bob Vila
Related Posts