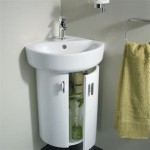
How to Install a Countertop Bathroom Sink
Installing a countertop bathroom sink is a relatively easy project that can be completed in a few hours. With a little planning and preparation, you can save yourself the cost of hiring a plumber. Here are the steps on how to install a countertop bathroom sink:
Step 1: Gather Your Materials
Before you begin, you will need to gather the following materials:
- Countertop bathroom sink
- Faucet
- Drain assembly
- P-trap
- Sink strainer
- Faucet supply lines
- Pipe wrench
- Wrench
- Screwdriver
- Level
- Measuring tape
- Pencil
- Caulk
- Painter's tape
Step 2: Prepare the Countertop
Begin by measuring the countertop to determine the center point. Mark the center point with a pencil. Once you have the center point, position the sink over the hole and trace the outline of the sink. Use a utility knife to cut the hole in the countertop.
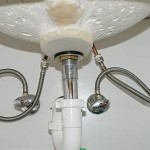
Step 3: Install the Drain Assembly
Place the drain assembly into the drain hole from the bottom of the sink. Hand-tighten the drain assembly until it is snug. Do not overtighten, or the drain assembly could break.
Step 4: Install the Faucet
Place the faucet in the hole in the sink and hand-tighten the nuts until they are snug. Do not overtighten, or you could damage the sink.
Step 5: Install the Faucet Supply Lines
Connect the faucet supply lines to the water supply valves under the sink. Use the pipe wrench to tighten the connections.
Step 6: Install the P-Trap
Connect the P-trap to the drain assembly and the sink drain. Use the pipe wrench to tighten the connections.
Step 7: Install the Sink Strainer
Place the sink strainer in the drain hole in the sink. Press down on the strainer until it is seated properly.
Step 8: Caulk the Sink
Apply a bead of caulk around the edge of the sink where it meets the countertop. Use the painter's tape to protect the countertop from the caulk. Allow the caulk to dry completely before using the sink.
Step 9: Test the Sink
Turn on the water supply and check for leaks. If you see any leaks, tighten the connections until the leak stops.
Step 10: Enjoy Your New Sink!
Your new countertop bathroom sink is now installed and ready to use. Enjoy!

How To Install Countertop Wash Basin HÖrvik Sink From

How To Install A Bathroom Vanity

Replace Vanity Top And Faucet Diy Network

How To Attach A Bathroom Sink Countertop

How To Install A Vessel Sink

Learn Installing A Countertop Sink Diy Projects

How To Install A Bathroom Sink Step By Guide

How To Remove Replace A Vanity Top Easy Bathroom Sink Remodel

How To Install Bathroom Sink On Granite Countertop

How To Replace A Bathroom Countertop Homeadvisor