How to Loosen a Stuck Moen Bathroom Faucet Handle: A Step-by-Step Guide
Stiff or stuck faucet handles can be a common annoyance in any bathroom. Fortunately, if you're dealing with a sticky Moen bathroom faucet handle, it's a fix you can easily manage on your own with a few simple steps and basic tools.
In this comprehensive guide, we'll take you through the essential steps to loosen a tight Moen bathroom faucet handle with precision and ease. Whether you're a seasoned DIYer or a novice homeowner, our detailed instructions will empower you to tackle this task confidently.
Step 1: Gather Your Tools
Before you begin, ensure you have the necessary tools for the job: a Phillips head screwdriver, a flat-head screwdriver, and optionally, a pair of pliers. Make sure your tools are in good working condition to avoid any frustrations during the process.
Step 2: Locate the Handle Screw
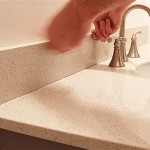
Inspect the base of the faucet handle for a small screw. It's usually situated under a plastic cap or cover. Using a flat-head screwdriver, gently pry off the cap, exposing the handle screw.
Step 3: Remove the Handle Screw
With your Phillips head screwdriver, carefully loosen the handle screw by turning it counterclockwise. Avoid overtightening or stripping the screw. Once loosened, remove the screw completely.
Step 4: Remove the Handle
Lift the faucet handle straight up to remove it from the faucet body. If it's particularly stuck, you can gently wiggle it back and forth while pulling up. Avoid using excessive force to prevent damage.
Step 5: Clean the Handle and Faucet Body
Over time, mineral deposits and grime can accumulate on the handle and faucet body, causing friction and stiffness. Use a damp cloth and a mild cleaning solution to wipe down both surfaces, removing any debris or residue.
Step 6: Apply Lubricant
To prevent future sticking, apply a small amount of plumber's grease or silicone-based lubricant to the O-rings or washers located on the handle and faucet body. This lubrication will reduce friction and ensure smooth operation.
Step 7: Reassemble the Handle
Align the handle with the faucet body and carefully slide it back into place. Tighten the handle screw using the Phillips head screwdriver, ensuring it's snug but not overtightened. Replace the plastic cap or cover over the screw.
Tips for Preventing Future Sticking
To maintain a smoothly functioning faucet handle, consider these preventive measures:
- Regularly clean the handle and faucet body to prevent mineral buildup.
- Use a gentle hand while operating the faucet handle, avoiding sudden or excessive force.
- If the handle becomes stiff again, repeat the loosening and lubrication process as described above.
Conclusion
By following these simple steps, you can effectively loosen a stuck Moen bathroom faucet handle and restore its smooth operation. Remember to gather the right tools, follow the instructions carefully, and apply lubricant for optimal performance. With a little patience and attention to detail, you can tackle this DIY task with confidence and enjoy a flawlessly functioning faucet once again.

How To Remove Moen Bathroom Faucet Handle In 2 Steps

Tighten A Loose Lever On Moen Brantford Faucet

Tighten A Loose Lever On Moen Brantford Faucet

How Do I Replace My Moen Bathroom Faucet Cartridge

How To Remove Moen Bathroom Sink Faucet Handles Mr Kitchen Faucets

Moen Faucet Handle Keeps Twisting Out Of Position

How To Remove A Moen Faucet Handle Quora

Moen Faucet Handle Keeps Twisting Out Of Position

How To Fix A Dripping Moen Faucet Howtolou Com

How To Fix A Leaking Faucet Without In The Handle Moen
Related Posts