How to Make a Bathroom Sink
A bathroom sink is a plumbing fixture that is used for washing hands, brushing teeth, and other personal hygiene tasks. Bathroom sinks come in a variety of shapes, sizes, and materials, and can be installed in a variety of locations. If you are considering installing a new bathroom sink, there are a few things you need to do to ensure that the job is done correctly.
Step 1: Choose the Right Sink
The first step is to choose the right sink for your bathroom. There are a few things you need to consider when choosing a sink, including:
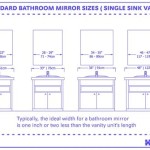
- Size: The size of the sink will depend on the size of your bathroom and the amount of space you have available.
- Shape: The shape of the sink will determine how it looks in your bathroom. There are a variety of shapes to choose from, including round, square, and oval.
- Material: The material of the sink will determine how durable it is and how easy it is to clean. Common sink materials include ceramic, porcelain, and stainless steel.
- Style: The style of the sink will complement the overall design of your bathroom. There are a variety of styles to choose from, including traditional, modern, and contemporary.
Step 2: Gather the Necessary Tools and Materials
Once you have chosen a sink, you will need to gather the necessary tools and materials to install it. These tools and materials include:
- A wrench
- A screwdriver
- A level
- A tape measure
- A caulk gun
- Caulk
- A basin wrench
- A new sink drain
- A new sink faucet
- A new water supply line
Step 3: Remove the Old Sink
Once you have gathered the necessary tools and materials, you can begin removing the old sink. To do this, follow these steps:
- Turn off the water supply to the sink.
- Disconnect the water supply lines from the sink.
- Disconnect the drainpipe from the sink.
- Remove the nuts that are holding the sink in place.
- Lift the sink out of the vanity.
Step 4: Install the New Sink
Once you have removed the old sink, you can install the new sink. To do this, follow these steps:
- Place the new sink in the vanity.
- Secure the sink in place with the nuts.
- Connect the drainpipe to the sink.
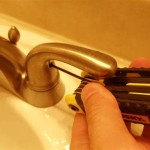
- Connect the water supply lines to the sink.
- Turn on the water supply to the sink.
Step 5: Test the Sink
Once you have installed the new sink, you should test it to make sure that it is working properly. To do this, turn on the water and check for leaks. If there are any leaks, tighten the nuts or bolts that are holding the sink in place.
Step 6: Clean Up
Once the sink is installed and tested, you can clean up the area. Wipe down the sink and vanity with a damp cloth to remove any dust or debris.
Conclusion
Installing a bathroom sink is a relatively easy project that can be completed in a few hours. By following these steps, you can ensure that the job is done correctly and that you have a new sink that you can enjoy for years to come.
:max_bytes(150000):strip_icc()/build-something-diy-vanity-594402125f9b58d58ae21158.jpg?strip=all "16 Diy Bathroom Vanity Plans You Can Build Today")
16 Diy Bathroom Vanity Plans You Can Build Today

10 Diy Bathroom Vanity Ideas The Family Handyman

Diy Vanity For Wall Mount Sink Jaime Costiglio

How To Make Bathroom Sink From Porcelain Tiles Step By

How To Diy A Bathroom Vanity Unit Wood Create
:max_bytes(150000):strip_icc()/mylove2create-5b325e5c46e0fb0037a89f15.jpg?strip=all "16 Diy Bathroom Vanity Plans You Can Build Today")
16 Diy Bathroom Vanity Plans You Can Build Today

How To Make A Bathroom Sink Vanity Unit Tiny Apartment Build Ep 1

How Create Your Own Bathroom Sink 15 Inspiring Ideas

Diy Open Shelf Vanity With Free Plans

How To Make A Bathroom Vanity From Vintage Furniture Upcycgirl
Related Posts