How To Measure & Replace a Bathroom Sink Faucet
Replacing a bathroom sink faucet can significantly update a bathroom's appearance and improve its functionality. This project is manageable for most homeowners with basic DIY skills. Accurate measurements and careful planning are crucial for a successful installation. This article provides a comprehensive guide to measuring for and replacing a bathroom sink faucet.
1. Assessing the Existing Faucet and Sink
Before purchasing a new faucet, carefully examine the existing setup. Identify the number of mounting holes in the sink or countertop. Common configurations include single-hole, centerset (4-inch spread), widespread (8-inch spread), and wall-mounted. Also, note the location of the shut-off valves under the sink. If the valves are corroded or difficult to operate, consider replacing them during the faucet installation.
2. Measuring for the New Faucet
Accurate measurements are essential to ensure the new faucet fits the sink properly. For centerset faucets, measure the distance between the center of the hot water handle and the center of the cold water handle. This measurement should be 4 inches. For widespread faucets, measure from the center of the hot water handle to the center of the cold water handle (typically 8 inches). Also, measure the distance from the back of the sink basin to the center of the faucet holes. This measurement helps determine the appropriate spout reach. For wall-mounted faucets, measure the distance between the water supply lines and the desired height of the faucet.
Additionally, consider the height of the faucet spout. A taller spout provides more clearance for washing hands and filling larger containers. However, an excessively tall spout may cause splashing. Balance functionality with aesthetics when selecting spout height.
3. Choosing the Right Faucet
Once the necessary measurements are taken, choosing a faucet that aligns with the sink configuration and desired style is possible. Various faucet styles are available, from traditional two-handle designs to modern single-handle models. Consider the bathroom's overall aesthetic and choose a faucet that complements it. Also, consider the faucet's finish, ensuring it matches other fixtures in the bathroom.
Beyond aesthetics, explore the faucet's functionality. Water-saving features, such as low-flow aerators, can help reduce water consumption. Touchless faucets offer enhanced hygiene and convenience. Research different faucet types and features to choose the best fit for the bathroom's needs.
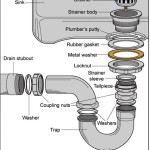
4. Gathering the Necessary Tools and Materials
Before beginning the installation process, gather all the necessary tools and materials. Typical tools include an adjustable wrench, basin wrench, plumber's putty, Teflon tape, and a screwdriver. Some faucets may require specialized tools, so refer to the manufacturer's instructions. Having all the necessary tools on hand will streamline the installation process.
In addition to tools, ensure all the necessary components for the new faucet are available. This includes the faucet body, handles, spout, mounting hardware, and supply lines. Carefully inspect the new faucet for any damage or missing parts before starting the installation.
5. Removing the Old Faucet
Turn off the water supply to the sink by closing the shut-off valves located under the sink. Once the water is off, open the faucet to release any remaining water pressure. Use an adjustable wrench or basin wrench to disconnect the supply lines from the old faucet. Depending on the faucet type, there may be additional nuts or screws securing the faucet to the sink. Carefully remove these fasteners and lift the old faucet from the sink.
After removing the old faucet, clean the sink surface thoroughly. Remove any old putty or caulk around the faucet mounting holes. A clean surface ensures a proper seal for the new faucet.
6. Installing the New Faucet
Follow the manufacturer's instructions carefully when installing the new faucet. Apply plumber's putty to the base of the new faucet where it will contact the sink. Insert the faucet into the mounting holes and secure it from below using the provided mounting hardware. Connect the supply lines to the faucet using an adjustable wrench. Wrap the threads of the supply lines with Teflon tape before tightening to ensure a watertight seal.
Once the faucet is installed, turn the water supply back on slowly. Check for any leaks around the base of the faucet and the supply line connections. If leaks are detected, tighten the connections as needed. If leaks persist, re-evaluate the connections and ensure proper sealing.
7. Testing the New Faucet
After the installation is complete, test the new faucet by turning it on and off several times. Check both the hot and cold water lines for proper function. Observe the water flow and ensure there are no leaks or unusual noises. A properly installed faucet should operate smoothly and efficiently.

How To Calculate The Overhang And Reach Dimensions Of A Lavatory Faucet Moen Solutions

How To Replace A Bathroom Faucet Tinged Blue

How To Measure A Bathroom Faucet The Home Depot

How To Replace A Bathroom Faucet Home Repair Tutor

How To Replace A Bathroom Faucet Removal And Installation

How To Replace A Bathroom Faucet Tinged Blue

How To Measure A Bathroom Sink Size Lavatory For Replacement

How To Replace A Bathroom Faucet Tinged Blue

How To Choose A New Bathroom Sink Faucet Vevano

How To Measure A Bathroom Faucet The Home Depot
Related Posts