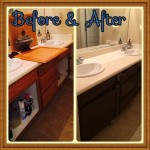
How to Paint Formica Bathroom Cabinets
Formica bathroom cabinets are a common sight in many homes. They're durable, easy to clean, and relatively inexpensive. However, over time, they can start to look dated or worn. If you're looking for a way to update your bathroom without breaking the bank, painting your Formica cabinets is a great option.
Here's a step-by-step guide on how to paint Formica bathroom cabinets:
Materials You'll Need
- Deglosser
- TSP cleaner
- Sandpaper (220-grit and 320-grit)
- Primer
- Paint
- Polyurethane
- Paintbrush or roller
- Tack cloth
Step-by-Step Instructions
1. Prepare the Surface
The first step is to prepare the surface of your cabinets. Start by cleaning them with a deglosser. This will help to remove any dirt or grime that may be on the surface. Once the cabinets are clean, use TSP cleaner to remove any remaining residue. Allow the cabinets to dry completely.
2. Sand the Surface
Once the cabinets are dry, it's time to sand them. Use 220-grit sandpaper to lightly sand the surface of the cabinets. This will help to create a smooth surface for the paint to adhere to. Once you've sanded the cabinets with 220-grit sandpaper, switch to 320-grit sandpaper and sand the cabinets again. This will help to create an even smoother surface.
3. Prime the Cabinets
Now it's time to prime the cabinets. Primer helps to create a barrier between the Formica and the paint. It also helps to ensure that the paint will adhere properly. Apply a thin coat of primer to the cabinets using a paintbrush or roller. Allow the primer to dry completely.
4. Paint the Cabinets
Once the primer is dry, it's time to paint the cabinets. Apply a thin coat of paint to the cabinets using a paintbrush or roller. Allow the paint to dry completely. Repeat this process until you've achieved the desired coverage.
5. Apply Polyurethane
Once the paint is dry, it's time to apply polyurethane. Polyurethane helps to protect the paint from scratches and wear. Apply a thin coat of polyurethane to the cabinets using a paintbrush or roller. Allow the polyurethane to dry completely.
6. Enjoy Your New Cabinets
Once the polyurethane is dry, your cabinets are finished! You can now enjoy your new, updated bathroom cabinets.
Tips
- Use a high-quality deglosser, TSP cleaner, and paint.
- Sand the cabinets thoroughly to create a smooth surface for the paint to adhere to.
- Apply thin coats of paint and polyurethane.
- Allow each coat to dry completely before applying the next.
- If you're painting a large number of cabinets, consider renting a paint sprayer.

How To Paint Laminate Cabinets Love Renovations

Paint Bathroom Vanity Countertop Sink So Easy A Piece Of Rainbow

How To Paint Laminate Cabinets A Erfly House

How To Paint Laminate Cabinets A Erfly House

The Elegant House Painting A Laminate Bathroom Vanity Painted Diy Cabinets

How To Paint Laminate Cabinets Love Renovations
:strip_icc()/101922779-2cbc45e123c34827afb4f601723b03ca.jpg?strip=all "How To Paint Bathroom Countertops")
How To Paint Bathroom Countertops

Painting Laminate Cabinets Southern Hospitality

How To Paint Laminate Cabinets Love Renovations

How To Paint Melamine Cabinets A Small Bathroom Makeover Diy Soheila
Related Posts