How to Plumb a Bathroom: A Step-by-Step Guide with Free Plumbing Diagrams
Plumbing a bathroom can seem like a daunting task, but it's actually a manageable project for homeowners with basic plumbing knowledge. With the right tools and materials, you can save significant money by completing this task yourself. This comprehensive guide will provide you with step-by-step instructions and free plumbing diagrams to ensure a successful bathroom plumbing installation.
Step 1: Gather Tools and Materials
Before starting, gather all necessary tools and materials, including:
- Pipe wrench or pliers
- Adjustable wrench
- Basin wrench
- Cordless drill
- Measuring tape
- Level
- Teflon tape
- Plumber's putty
- PVC or PEX pipes and fittings
- Drain traps
- Toilet flange
- Shower head and valve
- Faucet and valve
Step 2: Turn Off Water Supply
Locate the main water shut-off valve, usually found near the water meter or under the sink. Close the valve to stop the flow of water.
Step 3: Remove Old Fixtures
Use a wrench to disconnect the water supply lines and drain lines from the bathroom fixtures. Unscrew and remove the old fixtures, including the toilet, sink, showerhead, and faucet.
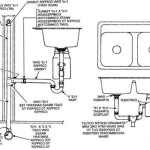
Step 4: Install Drain Traps
Connect the drain traps to the drains and seal them with plumber's putty. Ensure the traps are properly aligned to prevent water backup.
Step 5: Install Toilet Flange
Position the toilet flange over the drain line and secure it with screws. Seal around the flange with plumber's putty.
Step 6: Install Toilet
Place the toilet on the flange and tighten the bolts to secure it. Connect the water supply line to the toilet fill valve.
Step 7: Install Sink
Place the sink on the vanity or countertop and connect the drain line and water supply lines. Secure the sink with bolts or brackets.
Step 8: Install Showerhead and Valve
Attach the showerhead to the shower arm and connect the water supply lines to the valve. Use Teflon tape to seal the connections.
Step 9: Install Faucet
Mount the faucet to the sink and connect the water supply lines. Secure the faucet with bolts or nuts.
Step 10: Turn On Water Supply
Slowly open the main water shut-off valve and check for any leaks. If no leaks are found, turn on the faucets and shower to test the system.
Conclusion
Congratulations! You have successfully plumbed your bathroom. By following these steps and referencing the free plumbing diagrams provided, you have saved yourself both time and money. If you encounter any difficulties during the installation, do not hesitate to consult a professional plumber for assistance.

How To Plumb A Bathroom With Free Plumbing Diagrams
:strip_icc()/SCP_173_04-a5f887244add47e48d7a24d0579341d7.jpg?strip=all "The Ultimate Guide To Bathroom Plumbing Diagrams And Layouts")
The Ultimate Guide To Bathroom Plumbing Diagrams And Layouts

How To Plumb A Bathroom With Free Plumbing Diagrams

How To Plumb A Bathroom With Multiple Plumbing Diagrams Hammerpedia

What Does A Bathroom Plumbing Diagram For Rough In Look Like Quora

Does Every Toilet Need A Vent Pipe Quora

Index Php 550 396 Bathroom Plumbing Residential Installation

How Your Plumbing System Works Harris

How To Plumb A Bathroom With Multiple Plumbing Diagrams Hammerpedia

How To Plumb A Bathroom With Multiple Plumbing Diagrams Hammerpedia
Related Posts