How to Refinish A Bathroom Vanity With Chalk Paint
A well-maintained bathroom vanity can greatly enhance the aesthetics of your bathroom. If you're looking to give your bathroom vanity a fresh, new look without spending a lot of money, refinishing it with chalk paint is a great option. In this article, we'll provide a detailed guide on how to refinish a bathroom vanity with chalk paint, ensuring a professional-looking finish.
Materials You'll Need:
- Chalk paint in your desired color
- Chalk paint brush
- Sandpaper (120-grit and 220-grit)
- Tack cloth
- Polyurethane or wax (for sealing)
- Screwdriver or drill
- Painter's tape (optional)
- Drop cloth
Step 1: Preparation
- Remove all hardware from the vanity, including knobs, handles, and hinges.
- Cover any areas you don't want painted, such as the countertop or sink, with painter's tape.
- Thoroughly clean the vanity to remove any dirt or debris.
- Sand the vanity lightly with 120-grit sandpaper to create a smooth surface for the paint to adhere to. Remove any sanding dust with a tack cloth.
Step 2: Priming (Optional)
If your vanity is made of a dark wood or has a glossy finish, it's recommended to apply a primer before painting. This will help the chalk paint adhere better and prevent the original color from bleeding through.
- Apply a thin coat of primer to the vanity using a brush or roller. Allow the primer to dry completely.
- Lightly sand the primed surface with 220-grit sandpaper and remove any dust with a tack cloth.
Step 3: Painting
- Stir the chalk paint thoroughly before use.
- Apply the first coat of chalk paint using a brush or roller. Use long, even strokes and allow each coat to dry completely.
- Sand lightly with 220-grit sandpaper between coats to smooth out any brush strokes.
- Apply additional coats as needed until you achieve the desired coverage and finish.
Step 4: Sealing
Once the chalk paint is completely dry, it's important to seal it to protect the finish and make it more durable. You can use polyurethane or wax for sealing.
- Apply a thin coat of polyurethane or wax to the vanity using a brush or roller.
- Allow the sealer to dry completely before using the vanity.
- Repeat the sealing process for added protection.
Step 5: Reassemble
Once the vanity is completely sealed, you can reassemble it. Reattach the hardware you removed earlier and remove any painter's tape.
Tips for Success:
- Use a high-quality chalk paint for best results.
- Sand the vanity lightly between coats to create a smooth finish.
- Allow each coat of paint to dry completely before applying the next.
- Apply several coats of sealer for added durability.
- If you make a mistake, simply sand the area and repaint.
By following these steps, you can easily refinish your bathroom vanity with chalk paint, giving it a fresh, updated look that will complement your bathroom décor.

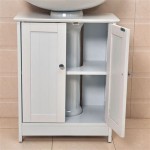
Bathroom Vanity Makeover With Chalk Paint Decor Adventures

Bathroom Vanity Makeover With Chalk Paint Decor Adventures

Chalk Painted Bathroom Vanity Makeover Our Storied Home

Bathroom Vanity Makeover With Chalk Paint Decor Adventures

Blue Diy Chalk Paint Bathroom Vanity Makeover Abbotts At Home

Blue Diy Chalk Paint Bathroom Vanity Makeover Abbotts At Home

Chalk Paint Bathroom Vanity Makeover Remodelaholic

Blue Diy Chalk Paint Bathroom Vanity Makeover Abbotts At Home

Chalk Paint Cabinets Bathroom Renovation

How To Completely Change Bathroom Cabinets With Paint Roots Wings Furniture Llc
Related Posts