How to Remove a Bathroom Vanity from the Wall
Removing a bathroom vanity from the wall may be necessary during a bathroom remodel or repair. Whether you are a seasoned DIYer or a novice plumber, understanding the proper steps involved is crucial for a safe and successful removal process. This guide will provide you with comprehensive instructions on how to remove a bathroom vanity from the wall, ensuring that you can complete the task efficiently and without causing damage to your bathroom or plumbing.
Materials Required
- Adjustable wrench
- Screwdriver (Phillips and flathead)
- Pliers
- Putty knife or flat pry bar
- Bucket or container
- Flashlight (optional)
Safety Precautions
Before beginning, ensure your safety by taking the following precautions:
- Turn off the water supply to your bathroom vanity.
- Open the faucets to release any remaining water in the pipes.
- Wear gloves to protect your hands from sharp edges or chemicals.
- Use a flashlight to illuminate dark areas under the vanity.
- Have a helper assist you if the vanity is particularly heavy.
Step-by-Step Instructions
- Clear the Vanity: Remove all items from the vanity, including drawers, shelves, and any personal belongings.
- Disconnect the Water Supply: Using an adjustable wrench, disconnect the water supply lines from the faucet to the shutoff valves below the vanity.
- Disconnect the Drain: Place a bucket under the drainpipe and loosen the slip nuts that connect the drainpipe to the vanity. Carefully remove the drainpipe and allow any remaining water to drain into the bucket.
- Remove the Countertops: If the vanity has countertops, use a screwdriver to remove the screws or bolts that secure them to the vanity. Carefully lift and remove the countertops.
- Locate and Remove Mounting Screws: Most vanities are mounted to the wall with screws located on the inside of the vanity cabinet. Use a screwdriver to remove these screws.
- Carefully Lift the Vanity: With the help of an assistant if needed, carefully lift the vanity straight up from the wall. Be cautious not to damage the wall or plumbing.
- Caulk Removal: If necessary, use a putty knife or flat pry bar to remove any caulk or sealant around the base of the vanity where it meets the wall.
Tips for Removing Heavy Vanities
For heavy vanities, consider the following tips to make the removal process easier:
- Divide and Conquer: If possible, separate the vanity into smaller sections for easier removal.
- Use a Dolly or Hand Truck: A dolly or hand truck can be used to support the weight of the vanity as you move it.
- Slide, Don't Lift: If the vanity is on a tile or smooth surface, you may be able to slide it forward before lifting it.
Conclusion
Removing a bathroom vanity from the wall is a task that requires careful planning and execution. By following these step-by-step instructions, you can successfully remove your vanity without causing damage or injury. Remember to take necessary precautions, use the right tools, and seek assistance if needed. With proper preparation and attention to detail, you can complete this task with confidence and ensure a successful bathroom renovation or repair.

How To Remove A Bathroom Vanity Remodel

How To Remove A Bathroom Vanity Budget Dumpster

How To Remove A Bathroom Vanity Remodel

How To Remove A Dated Vanity Backsplash Young House Love


How To Remove A Bathroom Mirror Lowe S

5 Easy Steps On How To Remove A Bathroom Vanity Diy Guide

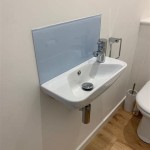
How To Remove And Install A Wall Mounted Sink In 2 Steps

How To Remove A Dated Vanity Backsplash Young House Love

How To Remove A Bathroom Vanity