Essential Aspects of Removing a Delta Bathroom Faucet Cartridge
Replacing a faulty faucet cartridge is crucial for restoring your bathroom faucet's functionality. Understanding the essential aspects of this process, particularly when working with a Delta bathroom faucet cartridge, is paramount. This article will delve into the key steps and considerations involved in removing a Delta bathroom faucet cartridge, ensuring a seamless and successful replacement.
Safety First
Before embarking on any plumbing task, it's essential to prioritize safety. Ensure that the water supply to the faucet is turned off at the main shut-off valve to prevent any water damage. Additionally, wear safety gloves and eye protection to safeguard yourself from potential hazards.
Gather Necessary Tools
To remove a Delta bathroom faucet cartridge, you will need a few essential tools: an adjustable wrench or basin wrench, a pair of pliers, a flathead screwdriver, and a towel. Having the right tools will make the process smoother and prevent any unnecessary delays.
Remove Handle and Escutcheon
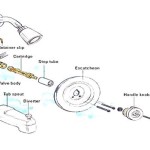
Start by removing the handle from the faucet. Using the adjustable wrench or basin wrench, loosen the nut that secures the handle and gently pull the handle off. Next, remove the escutcheon, the decorative plate around the base of the faucet handle, by carefully prying it loose with a flathead screwdriver.
Extract Cartridge Cap
Once the escutcheon is removed, you will see the cartridge cap. Using the pliers, gently loosen the cap by turning it counterclockwise. Do not overtighten the pliers, as it may damage the cap. Once loosened, remove the cap by hand.
Remove Cartridge
With the cartridge cap removed, you can now extract the cartridge. Gently pull the cartridge straight up and out of the faucet body. If the cartridge is stuck, you can use a pair of pliers to carefully grip and remove it. Be cautious not to damage the cartridge or the faucet body during this step.
Conclusion
Removing a Delta bathroom faucet cartridge involves several essential aspects, including safety precautions, gathering the right tools, following the proper steps for removing the handle, escutcheon, cartridge cap, and cartridge itself. By understanding these key steps and considerations, you can successfully replace your faulty cartridge and restore your bathroom faucet to optimal functionality.

How To Replace The Cartridge In A Single Handle Delta Faucet Repair

Tutorial Delta Faucet Cartridge Replacement

Quickly Replace A Leaky Faucet Cartridge Diy Family Handyman

Replacing Delta Shower Cartridge

Delta Rless Faucet Cartridge Installation

How To Rebuild A Delta Single Handle Faucet

Can T Remove Delta Faucet Cartridge

Delta Bathroom Faucet Repair Seats And Springs Serramar Hoa

Delta Faucet Cartridge Repair

How To Replace A Delta Cartridge And Fix Leaky Bathtub Faucet It Tutorials
Related Posts