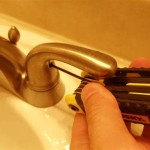
How to Remove and Replace a Bathroom Faucet
A leaky or outdated bathroom faucet can be a source of frustration and expense. Fortunately, replacing a faucet is a relatively straightforward task that can be completed in a few hours with the right tools and materials. Here's a step-by-step guide to help you remove and replace a bathroom faucet:
Materials You'll Need:
- New bathroom faucet
- Adjustable wrench
- Basin wrench
- Plumber's putty
- Teflon tape
Step 1: Gather Your Tools and Materials
Before you begin, gather all the necessary tools and materials. Make sure you have the correct wrench sizes for your faucet and that the new faucet is compatible with your sink.
Step 2: Turn Off the Water Supply
Locate the water shut-off valves beneath the sink and turn them clockwise to shut off the water supply. Open the faucet to release any remaining water in the lines.
Step 3: Disconnect the Water Supply Lines
Use an adjustable wrench to loosen the nuts connecting the water supply lines to the faucet. Be careful not to overtighten or damage the lines.
Step 4: Remove the Mounting Nuts
Use a basin wrench to loosen the mounting nuts that hold the faucet in place. These nuts are usually located beneath the sink.
Step 5: Pull Out the Old Faucet
Once the mounting nuts are loose, gently pull the old faucet out of the sink. Be careful not to damage the sink or countertop.
Step 6: Prepare the New Faucet
Wrap the threads on the new faucet's water supply lines with Teflon tape. This will help create a watertight seal.
Step 7: Apply Plumber's Putty
Roll out a small amount of plumber's putty and form it into a ring. Place the putty around the base of the new faucet, where it will meet the sink.
Step 8: Insert the New Faucet
Carefully insert the new faucet into the sink, ensuring that the plumber's putty creates a seal. Tighten the mounting nuts by hand, then use the basin wrench to fully tighten them.
Step 9: Reconnect the Water Supply Lines
Hand-tighten the water supply lines to the new faucet. Use an adjustable wrench to further tighten them, being careful not to overtighten.
Step 10: Turn On the Water Supply
Slowly turn on the water shut-off valves and check for leaks. If any leaks occur, tighten the connections as needed.
Step 11: Test the New Faucet
Operate the new faucet to ensure that it functions properly and there are no leaks. Adjust the hot and cold water handles to find the desired temperature.
Congratulations! You have successfully removed and replaced your bathroom faucet.

Diy How To Replace A Bathroom Sink Faucet Remove Install

How To Replace A Bathroom Faucet Home Repair Tutor

How To Replace A Bathroom Faucet Home Repair Tutor

How To Remove And Install A Bathroom Faucet

How To Replace A Bathroom Faucet Tinged Blue

How To Remove And Install A Bathroom Faucet

How Do I Replace Bathroom Sink Faucet Handles Cleaning More

How To Remove And Install A Bathroom Faucet

How To Replace A Bathroom Faucet Home Repair Tutor

How To Install Replace A Bathroom Faucet