How to Remove a Bathroom Exhaust Housing
Bathroom exhaust housing plays a vital role in maintaining proper ventilation and eliminating excess moisture. Over time, however, the housing may become clogged or require cleaning, making it necessary to remove it. Here's a detailed guide on how to remove a bathroom exhaust housing safely and efficiently.
Step 1: Safety Precautions
Before starting, ensure the safety of the work area. Turn off the power to the exhaust fan at the breaker box to prevent any electrical accidents. Wear safety glasses and a mask to protect against dust and debris.
Step 2: Locate and Identify
Find the exhaust housing, which is usually located on the ceiling or wall of the bathroom. Remove the cover plate to expose the housing. Identify the type of housing, as different models may have varying removal methods.
Step 3: Remove the Grille
Most exhaust housings have a grille that covers the fan opening. Look for screws holding the grille in place. Using a screwdriver, remove the screws and gently pull the grille away from the housing.
Step 4: Disconnect Wiring
Locate the electrical wiring connected to the exhaust fan. Carefully disconnect the wires by pulling them straight out of the fan terminals. Note the positions of the wires for proper reconnection later.
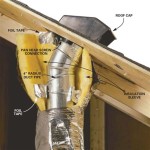
Step 5: Unmount the Housing
Depending on the housing type, it may be attached to the ceiling or wall with screws or clips. Remove the screws or release the clips to detach the housing. Remember to support the housing as you remove it.
Step 6: Clean or Replace the Housing
Once removed, clean the housing thoroughly to remove any dust or debris. If the housing is damaged or clogged, replace it with a new one. Ensure the new housing is compatible with the fan motor before installation.
Step 7: Reassemble and Reconnect
Align the housing with the original location and secure it using screws or clips. Reconnect the electrical wires to the fan terminals and tighten the wire nuts to ensure a secure connection.
Step 8: Install the Grille
Place the grille over the fan opening and align the screw holes. Insert the screws and tighten them to secure the grille in place. Replace the cover plate and turn on the power to test the fan operation.
Tips:
- If the screws are rusted or difficult to remove, use a penetrating oil to loosen them.
- Label the wires before disconnecting them to ensure correct reconnection.
- If the fan motor or wiring appears damaged, contact a qualified electrician for repairs.
- Clean the bathroom exhaust housing regularly to maintain optimal ventilation.
By following these steps carefully, you can safely remove and replace a bathroom exhaust housing, ensuring proper ventilation and improving indoor air quality.

Help Can T Remove Old Bathroom Exhaust Fan Housing Doityourself Com Community Forums

Not Sure How To Remove Old Bathroom Fan Install New One Doityourself Com Community Forums

How To Replace A Bathroom Exhaust Fan Without Attic Access 12 Step Guide Home Inspector Secrets

How To Replace A Bathroom Fan With Pictures Wikihow

How To Replace A Bathroom Exhaust Fan Without Attic Access 12 Step Guide Home Inspector Secrets

Remove Install A Bathroom Fan Grille In 1 Min

Help Can T Remove Old Bathroom Exhaust Fan Housing Doityourself Com Community Forums

How To Replace A Bathroom Fan With Pictures Wikihow

How To Replace A Bathroom Exhaust Fan Stanley Tools

Help Can T Remove Old Bathroom Exhaust Fan Housing Doityourself Com Community Forums
Related Posts