Essential Aspects of Removing a Bathroom Heater Ventil
Removing a bathroom heater ventil is a crucial aspect of maintaining and replacing the heating system. It requires careful attention to detail and an understanding of the essential steps involved. The process involves disconnecting electrical connections, unscrewing bolts, and removing the ventil. Neglecting any of these steps can lead to potential safety hazards or damage to the heater.
Understanding the part of speech of the keyword "How To Remove Bathroom Heater Ventil" helps define the content's focus.
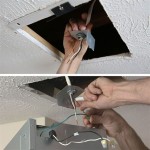
Step 1: Disconnect Electrical Connections
The first step is to disconnect the electrical connections to the ventil. This involves turning off the circuit breaker or fuse that supplies power to the heater. Using a voltage tester, confirm that the power is off before proceeding further. Next, locate the junction box where the electrical wires connect to the ventil. Carefully remove the cover and disconnect the wires, noting their positions for reconnection later.
Step 2: Remove Mounting Bolts
Once the electrical connections are disconnected, the mounting bolts holding the ventil in place can be removed. Most bathroom heater ventils are secured with two or three bolts. Using a wrench or screwdriver, carefully unscrew the bolts and set them aside. Once the bolts are removed, the ventil will be loose and ready to be removed.
Step 3: Remove the Ventil
Carefully grip the ventil and pull it straight out from the unit. There may be some resistance, but avoid using excessive force that could damage the unit. Gently wiggle the ventil back and forth if it does not come off easily. Once the ventil is removed, inspect the unit for any visible damage or corrosion that may require further attention.
Step 4: Clean and Reassemble
Before reassembling the unit, clean the mating surfaces of the ventil and the heater unit to ensure a good seal. Use a damp cloth to wipe away any dust or debris. Once the surfaces are clean, align the ventil with the unit and carefully insert it. Hand-tighten the mounting bolts to secure the ventil in place.
Step 5: Reconnect Electrical Connections
Finally, reconnect the electrical wires to the ventil in the same positions as before. Screw on the junction box cover tightly and restore power to the heater by turning on the circuit breaker or fuse. Test the heater's operation to ensure it is functioning correctly before putting it back into regular use.

Faqs Frequently Asked Questions Indoor Climate Kermi

Så Monteras En Push Open Ventil Och Bottenventil Med Lyftstång Vvsochbad Se

Bathroom Radiators Modern Heating Designs For Bathrooms Arbonia

Installation Example Of A Thermex Id Shadow Horizontal Electric Water Heater

Ventilation Fan Catalogue

Electric Towel Rails

Terma Aire Designer Heated Towel Radiator Only Radiators

Sc Na Ventil Comfort Komforts Net Evasat

Thermostatic Radiator Valves Our Guide

Vigo Arden 34 In W X 78 H Frameless Fixed Shower Screen Door Stainless Steel With 3 8 10mm Fluted Glass Vg6094stfl3478 The Home Depot
Related Posts