How to Remove Bathroom Sink Screen
Bathroom sink screens can trap hair, soap scum, and other debris, preventing water from draining properly. Regular cleaning of the sink screen is essential to keep your sink functioning efficiently and prevent clogging. Here's a step-by-step guide on how to remove the bathroom sink screen for cleaning:
Step 1: Gather Tools and Materials
You'll need a few tools and materials to remove the bathroom sink screen:
Step 2: Turn Off Water Supply
Locate the water supply valves under the sink and turn them off to prevent water from flowing into the sink while you're working. If there are no valves under the sink, you'll need to turn off the main water supply to your home.
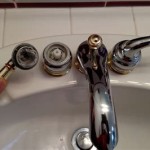
Step 3: Lift the Cap
Most bathroom sink screens have a removable cap that covers the screen. Look for the cap, usually located in the center of the screen. Use your fingers or a pair of pliers to gently lift the cap and remove it.
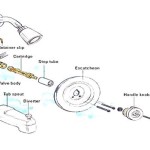
Step 4: Remove the Screen
Once the cap is removed, you can access the sink screen. Use pliers or needle-nose pliers to grasp the screen and carefully lift it out of the drain hole.
Step 5: Clean the Screen
Use an old toothbrush or small brush to remove any debris or buildup from the screen. If the screen is heavily soiled, soak it in a bleach solution for 15-30 minutes before brushing. Rinse the screen thoroughly with water.
Step 6: Clean the Drain
While the screen is out, check the drain for any debris or clogs. Use a drain snake or a wire hanger to remove any hair or other obstructions. If the clog is deep in the drain, you may need to use a chemical drain cleaner.
Step 7: Reinstall the Screen and Cap
Once the screen and drain are clean, carefully insert the screen back into the drain hole. Make sure it's sitting properly and there are no gaps around the edges. Replace the cap onto the screen and press it firmly into place.
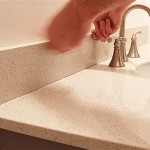
Step 8: Turn On Water Supply
Turn on the water supply valves under the sink. Check for any leaks around the screen or cap. If you notice any dripping, turn off the water and retighten the cap or screen as needed.
By following these steps, you can easily remove and clean the bathroom sink screen, ensuring proper drainage and preventing clogs in the future. Regular cleaning and maintenance will keep your bathroom sink functioning efficiently for years to come.
How To Clean A Sink Faucet Screen

How To Replace A Sink Aerator

How To Clean A Bathroom Sink Faucet Aerator Screen Low Water Pressure

How To Clean Your Faucet Aerator Zn Construction

Fixing A Faucet Aerator You Can Be Diy R Too The Kim Six Fix

Plumbing Advice How To Remove A Sink Drain Assembly

How To Clean Faucet Aerator Simpson Plumbing Llc

How To Clean A Bathroom Sink Faucet Aerator Screen Low Water Pressure

How To Remove A Sink Stopper The Home Depot

How To Fix Your Flow Delta Faucet Blog
Related Posts