How To Remove Caulking Around Bathroom Sink
Caulking is an essential part of any bathroom, as it helps to seal gaps around your sink and keep water from seeping into the surrounding area. Over time, however, caulking can become discolored, cracked, or moldy, making it necessary to remove and replace it. Removing caulking is not a difficult task, but it does require some patience and care. Here are the steps on how to remove caulking around bathroom sink:
Materials you’ll need:
- Caulk removal tool or utility knife
- Rags or paper towels
- Rubbing alcohol or denatured alcohol
- Clean cloths
Instructions:
1. Prepare the area: Before you start removing the caulking, it is important to prepare the area. Remove any items from the sink and vanity, and cover the floor with a drop cloth to protect it from any caulk or debris. You may also want to wear gloves to protect your hands.
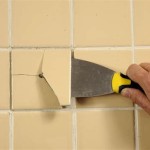
2. Score the caulk: Using a caulk removal tool or a utility knife, score the caulk around the sink. This will help to break the seal and make it easier to remove.
3. Remove the caulk: Once the caulk has been scored, you can start to remove it. Use the caulk removal tool or utility knife to gently pry the caulk away from the sink. Be careful not to damage the sink or the surrounding area.
4. Clean the area: Once the caulk has been removed, you can clean the area with rubbing alcohol or denatured alcohol. This will help to remove any remaining caulk residue and prepare the surface for new caulk.
5. Apply new caulk: Once the area has been cleaned, you can apply new caulk. Be sure to follow the manufacturer's instructions for applying the caulk, and allow it to dry completely before using the sink.
Tips:
- If the caulk is particularly thick or stubborn, you may need to use a heat gun to soften it before removing it.
- Be careful not to damage the sink or surrounding area when removing the caulk.
- Allow the new caulk to dry completely before using the sink.
Conclusion
Removing caulking around a bathroom sink is not a difficult task, but it does require some patience and care. By following the steps above, you can safely and easily remove the old caulk and replace it with new caulk, helping to keep your bathroom looking its best.
How To Re Caulk A Bathroom Sink Ifixit Repair Guide

How To Clean Remove Reapply Caulk In Kitchens And Bathrooms

How To Re Caulk A Bathroom Sink Ifixit Repair Guide

The Best Tricks How To Remove Caulk

How To Replace Caulk Around Your Bathroom Sink In A Few Minutes

How To Re Caulk A Bathroom Sink Ifixit Repair Guide

Bathroom Caulk Replacement

How To Re Caulk A Bathroom Sink Ifixit Repair Guide

How To Caulk Bathroom Surfaces The Inspector Blog

How To Caulk A Bathroom Sink 12 Steps With Pictures Wikihow
Related Posts