How to Remove a Delta Bathroom Faucet Drain
Removing a Delta bathroom faucet drain is a straightforward task that can be completed in a few simple steps. Whether you're replacing an old or damaged drain or simply cleaning out a clogged one, this guide will provide you with the necessary instructions to do it yourself.
Gather Your Tools
Before you begin, ensure you have the following tools on hand:
* Adjustable wrench or pliers * Bucket or bowl * Rag or towel * Screwdriver (optional)Step-by-Step Instructions
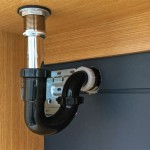
1. Turn Off the Water Supply
Locate the water supply valves under the sink and turn them off to prevent any water from flowing while you work.
2. Remove the Drain Cap
Using the adjustable wrench or pliers, carefully loosen the drain cap located at the top of the drain assembly. Remove the cap and set it aside.
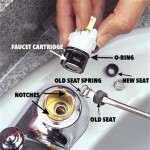
3. Pull Out the Drain Stem
Reach inside the drain assembly and locate the drain stem. Use your fingers or a pair of pliers to pull the stem straight up and out of the assembly.
4. Remove the Rubber Washer
Once the drain stem is removed, you will see a rubber washer attached to the bottom. Use your fingers or a screwdriver to remove the washer.
5. Unscrew the Drain Assembly
With the rubber washer removed, you can now unscrew the drain assembly by turning it counterclockwise. Place a bucket or bowl beneath the drain to catch any excess water.
6. Clean and Inspect
Remove any debris or clogs from the drain assembly and inspect it for any damage or wear. If necessary, replace the rubber washer or any other worn components.
7. Reassemble
To reassemble the drain, simply follow the steps in reverse order. Screw the drain assembly back into place, insert the drain stem and rubber washer, and screw the drain cap back on.
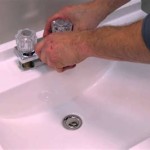
8. Turn on the Water
Once the drain is reassembled, turn the water supply valves back on and check for any leaks.
Tips
* If the drain assembly is stuck or difficult to remove, you can use a penetrating oil to help loosen it up. * Be careful not to overtighten the drain cap, as this can damage the drain assembly. * If you are replacing the drain assembly, make sure to use a new rubber washer to ensure a watertight seal.
Install A Drain Stopper So The Is Removable

Bathroom Sink Popup And Stopper Problems

How To Remove A Delta Bathroom Sink Pop Up Stopper Hunker

Tips Tricks Remove Delta 2 Handle 4 In Bathroom Sink Faucet With Bar 5 21 18

How To Remove A Delta Sink Stopper Step By

How To Rebuild A Delta Single Handle Faucet

How To Repair Leaking Dripping Delta Faucet Diyplumbing Serviceplumbing Tappplumbing

How To Remove A Bathroom Faucet And Pop Up Drain Delta Blog

How To Remove A Bathroom Sink Stopper Take Out Pop Up Drain From

How To Install A Delta Pop Up Sink Drain
Related Posts