How to Remove a Delta Bathroom Faucet Stem
Delta bathroom faucets are known for their durability and reliability, but even the most robust fixtures can require maintenance or repairs from time to time. One common issue that may necessitate replacement is a worn-out or damaged faucet stem. This component, also known as a cartridge or valve stem, controls water flow and temperature. If you experience problems with water leakage, inconsistent water pressure, or difficulty turning the faucet handle, replacing the stem could be the solution.
Removing a Delta bathroom faucet stem is a relatively straightforward process that can often be completed by a homeowner with basic plumbing skills. This article outlines the steps involved, providing a comprehensive guide for tackling this plumbing task.
Gather the Necessary Tools
Before embarking on the removal process, ensure you have the following tools readily available:
- Adjustable wrench
- Channel-lock pliers
- Phillips screwdriver
- Flathead screwdriver
- Basin wrench (optional, but recommended)
- Replacement faucet stem
- Towel or absorbent cloth
- Bucket or container
Having all these tools at hand will streamline the process and ensure a smooth replacement of the faucet stem.
Steps for Removing the Delta Bathroom Faucet Stem
Follow these steps for safely and effectively removing the Delta bathroom faucet stem:
- Turn off the water supply. Locate the shut-off valve for your bathroom sink and turn it completely off. This will prevent water from flooding the area while you work.
- Drain the faucet. Open the faucet handles to drain any remaining water in the pipes and faucet body. You can also use a small bucket to catch the water as it drains.
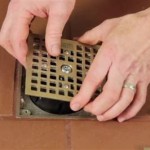
- Remove the handle and escutcheon plate. The handle is usually held in place by a screw or a set screw. Use the appropriate screwdriver to remove the screw and carefully lift off the handle. Next, remove the escutcheon plate, which is the decorative cover around the faucet stem, by loosening the screws holding it in place.
- Remove the packing nut. The packing nut is the circular ring located beneath the escutcheon plate. It secures the stem to the faucet body. Use the channel-lock pliers or basin wrench to grip the packing nut and turn it counterclockwise to loosen and remove it.
- Remove the stem. With the packing nut removed, gently pull the stem out of the faucet body. It may be necessary to twist or wiggle it slightly to dislodge it.
Troubleshooting Common Issues
While the process outlined above is generally straightforward, you may encounter obstacles during the removal process. Here are common issues and their solutions:
- The handle won't come off. There might be a hidden set screw underneath the handle. Use a flathead screwdriver to try to locate and loosen the screw.
- The packing nut is stuck. If the packing nut is tightly stuck, you can use a pipe wrench for extra leverage. Be careful not to overtighten the wrench as it could damage the nut or the faucet body.
- The stem won't come out. If the stem is stubborn, you might need to apply some penetrating oil or WD-40 to the stem threads before attempting to pull it out.
Remember to always exercise caution and avoid using excessive force, which could damage the faucet. If you encounter persistent difficulties, it's best to consult a qualified plumber for assistance.

Delta Bathroom Faucet Repair Seats And Springs Serramar Hoa

Delta Faucet Repair Tips

Tutorial Delta Faucet Cartridge Replacement

How To Replace A Delta Tub Or Shower Cartridge

Delta Shower Handle Cartridge Replacement Ifixit Repair Guide

Can T Remove Delta Faucet Cartridge

How To Replace A Delta Tub Spout Everyday Home Repairs

How To Fix A Leaking Faucet Handle Replacing Stem Assembly

Delta Shower Handle Cartridge Replacement Ifixit Repair Guide

Simple Ways To Fix A Leaky Delta Bathroom Sink Faucet
Related Posts