How To Remove Hansgrohe Bathroom Faucet Handles
Hansgrohe is known for its sleek and modern bathroom fixtures. However, like all faucets, occasional maintenance or replacement necessitates removing the handles. This process might seem daunting at first, but with the right tools and a careful approach, it can be accomplished without professional assistance. This guide provides a step-by-step approach to removing Hansgrohe bathroom faucet handles, covering various handle types and addressing potential challenges.
Identifying the Handle Type
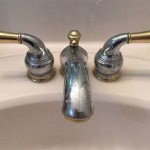
Before starting, it is crucial to identify the type of Hansgrohe faucet handle. Different handle designs require slightly different removal methods. Common types include lever handles, cross handles, and knob handles. Lever handles are typically identified by their single lever operation for both temperature and flow control. Cross handles have separate hot and cold controls and are recognizable by their perpendicular design. Knob handles, while less common in modern Hansgrohe lines, operate by turning a knob to control water flow and temperature.
Determining the handle type helps select the appropriate tools and techniques for removal. Referencing the original product documentation or the Hansgrohe website can be helpful if there is any uncertainty about the handle type.
Gathering the Necessary Tools
Having the right tools on hand simplifies the removal process and minimizes the risk of damage to the faucet. Commonly required tools include an Allen wrench (also known as a hex key), a small flathead screwdriver, and possibly a Phillips head screwdriver. Some Hansgrohe handles incorporate a small set screw hidden beneath a decorative cap. In these cases, a small flathead screwdriver or a utility knife is necessary to pry off the cap. It is recommended to protect the finish of the faucet with a soft cloth or masking tape during the process to prevent scratches from tools.
Keeping the tools organized in a designated area ensures they are readily available during the removal process. This prevents interruptions and helps maintain a focused and efficient workflow.
Removing the Handle
Once the handle type is identified and the necessary tools are gathered, the handle removal can begin. The following steps provide a general guideline, but variations might exist depending on the specific Hansgrohe model.
For Lever Handles: Typically, a small set screw is located underneath the lever handle base. Use the appropriate size Allen wrench to loosen and remove this set screw. Once the set screw is removed, the handle should pull straight off the faucet body. Some lever handles might require a slight twisting motion while pulling to disengage them.
For Cross Handles: Similar to lever handles, cross handles often have a set screw located behind a decorative cap. Carefully pry off the cap with a small flathead screwdriver or a utility knife. Then, use the appropriate size Allen wrench to remove the set screw. The handle should then be able to be pulled off the valve stem. Occasionally, mineral buildup can make it difficult to remove the handle. In such cases, penetrating oil can be applied and allowed to sit for a few minutes before attempting removal again.
For Knob Handles: Knob handles might be secured with a set screw or a threaded mechanism. If a set screw is present, follow the same process as for lever and cross handles. If the knob is threaded, turn it counterclockwise to unscrew it from the valve stem.
Addressing Common Challenges
Sometimes, handles become stuck due to mineral buildup or corrosion. If a handle resists removal, avoid excessive force, which could damage the faucet. Instead, apply penetrating oil to the base of the handle and allow it to penetrate for several minutes. Afterward, gently try to wiggle the handle while pulling to break it free.
If the set screw is stripped, a screw extractor can be used to remove it. Alternatively, a professional plumber can be contacted for assistance. Taking preventative measures such as regularly cleaning the faucet and avoiding excessive tightening of the set screws can prevent future issues.
Post-Removal Considerations
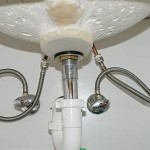
Once the handles are removed, inspect the underlying components for any signs of wear or damage. This is an opportune time to replace worn-out O-rings or cartridges. Ensure all components are clean before reinstalling the handles or replacing them with new ones. Properly storing removed handles and screws prevents loss and simplifies reinstallation.

Hansgrohe Widespread Bathroom Faucet Removal Diy Home Improvement Forum

Hansgrohe Sink Mixers Logis Widespread Faucet 150 With Pop Up Drain 1 2 Gpm Art No 71533001

Hansgrohe Metris 8 In Widespread Double Handle Bathroom Faucet Brushed Nickel 31083821 The Home Depot

Hansgrohe Sink Mixers Joleena Widespread Faucet 100 With Pop Up Drain 1 2 Gpm Art No 04774000

Hansgrohe Metris Single Handle Hole Bathroom Faucet In Brushed Nickel 31088821 The Home Depot

Hansgrohe 31083821 Metris 1 2 Gpm Widespread Bathroom Build Com

Hansgrohe Metris C Chrome Widespread 2 Handle Watersense Bathroom Sink Faucet With Drain In The Faucets Department At Com

Hansgrohe Sink Mixers Locarno Single Hole Faucet 210 1 2 Gpm Art No 04811000 Usa

Hansgrohe Vivenis Single Handle Bathroom Faucet In Brushed Nickel 75020821 The Home Depot

Hansgrohe Metris Single Handle Hole Bathroom Faucet In Chrome 31121001 The Home Depot
Related Posts