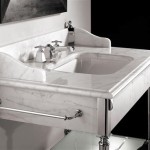
How To Remove Moen Bathroom Faucet Drain
Understanding the essential aspects of removing a Moen bathroom faucet drain is crucial for successful completion of the task. These aspects encompass identifying the type of drain, gathering necessary tools, familiarizing oneself with the removal process, addressing potential challenges, and ensuring the proper functioning of the drain after removal.
To delve deeper into these essential aspects, this article will provide a comprehensive guide, addressing each component in detail to empower you with the knowledge and skills required for a seamless drain removal experience.
Identifying the Type of Drain
Identifying the type of drain you're dealing with is the first step. Moen bathroom faucets typically feature two common drain types: pop-up drains and lift-and-turn drains.
Pop-up drains utilize a push-button mechanism to open and close the drain, while lift-and-turn drains require a simple twist to operate.
Correctly identifying the drain type will guide your choice of removal method and ensure a successful outcome.
Gathering Necessary Tools
Before embarking on the removal process, gather the necessary tools. These typically include a pair of pliers, an adjustable wrench, a flat-head screwdriver, and a bucket for collecting water.
Having the right tools at hand will ensure a smooth and efficient removal.
Understanding the Removal Process
The removal process varies slightly depending on the drain type. For pop-up drains, you'll need to remove the cap, unscrew the retaining nut, and lift the drain assembly out.
Lift-and-turn drains involve removing the drain stopper, unscrewing the mounting nut, and pulling the drain assembly upward.
Following the appropriate steps for your drain type will ensure a safe and successful removal.
Addressing Potential Challenges
During the removal process, you may encounter challenges such as a stuck drain assembly or a damaged retaining nut. To address these, apply penetrating oil to loosen stuck parts and use a pair of pliers to gently break free damaged nuts.
Patience and careful handling will help you overcome these challenges and complete the removal.
Ensuring Proper Functioning
After removing the drain, inspect the drain assembly for any damage or wear. If necessary, replace worn-out parts or the entire assembly to ensure proper functioning.
Reinstall the drain assembly correctly and test its operation to guarantee a leak-free, fully functional drain.
By following these essential aspects, you can confidently remove a Moen bathroom faucet drain and ensure its proper functioning, empowering you to maintain a clean and well-maintained bathroom.

How To Remove Clean Moen Bathroom Sink Drain Pop Up Stopper Slow Draining Clogged Hair

How To Remove Moen Bathroom Faucet Handle In 2 Steps

Bathroom Faucet With Drain Replacement

Diy Bathroom Faucet

How To Install Bathroom Faucet And Drain Moen Adler Collection

Install Moen Bathroom Sink Faucet And Drain

Bathroom Faucet Cartridge Replacement

Moen Eva 8 In Widespread 2 Handle Bathroom Faucet Trim Kit Brushed Nickel Valve Included T6420bn 9000 The Home Depot

Moen Brantford 4 In Centerset 2 Handle Low Arc Bathroom Faucet Brushed Nickel With Metal Drain Assembly 6610bn The Home Depot

Diy How To Install The Moen Boardwalk Faucet Redhead Mom
Related Posts