How To Remove Mold From Bathroom Shower Caulk
Mold growth in bathroom shower caulk is a common problem due to the consistently warm, humid environment. Left untreated, mold can not only look unsightly but also contribute to respiratory issues and unpleasant odors. Fortunately, removing mold from shower caulk is a manageable task with the right tools and techniques.
Assessing the Mold Problem
Before beginning the mold removal process, it is crucial to assess the extent of the mold growth. This will determine the appropriate cleaning method and the necessary safety precautions. Superficial mold can often be addressed with cleaning solutions, whereas deeply embedded mold may require caulk removal and replacement.
Essential Safety Precautions
Protecting one's health during the mold removal process is paramount. Proper ventilation is crucial to prevent the inhalation of mold spores. Wearing gloves, eye protection, and a mask is highly recommended. Opening a window and running a bathroom fan can significantly improve ventilation.
Cleaning Solutions for Superficial Mold
For surface mold on the caulk, several cleaning solutions can be effective. A mixture of bleach and water (one part bleach to ten parts water) is a common solution. Alternatively, white vinegar, baking soda paste, or commercial mold cleaners can be used. Always test any cleaning solution on a small, inconspicuous area of the caulk first to ensure compatibility.
Applying the Cleaning Solution
After selecting a cleaning solution, apply it to the affected caulk. A spray bottle is recommended for even application. Allow the solution to dwell on the mold for the recommended time, typically between 15 to 30 minutes, depending on the product and severity of the mold. This dwelling time allows the solution to penetrate and break down the mold.
Scrubbing and Rinsing
After the dwell time, scrub the caulk with a stiff-bristled brush, such as an old toothbrush or grout brush. Pay attention to the crevices where mold tends to accumulate. Thoroughly rinse the area with clean water to remove all traces of the cleaning solution and loosened mold. Ensure adequate ventilation during this process.
Drying the Area
Once the area is rinsed, thoroughly dry the caulk and surrounding tiles. Excess moisture can contribute to future mold growth. Use a clean towel to wipe down the surfaces, and consider using a fan to expedite the drying process. Maintaining a dry environment is key to preventing mold recurrence.
Removing and Replacing Heavily Molded Caulk
If the mold has deeply penetrated the caulk or if the caulk is old and cracking, removal and replacement are the most effective solutions. A utility knife or caulk removal tool can be used to carefully cut away the existing caulk. Wear safety glasses during this process to protect eyes from debris.
Preparing the Surface for New Caulk
After removing the old caulk, thoroughly clean the area with a bleach solution or a mold-killing primer. Ensure the surface is completely dry before applying new caulk. This ensures proper adhesion of the new caulk and helps prevent future mold growth.
Applying New Caulk
Apply a thin, even bead of caulk along the joint where the tiles and shower or tub meet. Use a caulk gun for a consistent application. Smooth the bead with a wet finger or caulk smoothing tool for a professional finish. Allow the new caulk to cure completely according to the manufacturer's instructions before using the shower.
Preventing Future Mold Growth
Preventing mold growth requires diligent attention to moisture control and regular cleaning. Ensure adequate ventilation by running the bathroom fan during and after showers. Wipe down shower surfaces after each use to remove excess water. Periodically clean the caulk with a mild cleaning solution to prevent mold from taking hold.
Regular Maintenance and Cleaning
Regular cleaning is vital for preventing mold recurrence. Incorporate cleaning the shower caulk into the regular bathroom cleaning routine. A simple wipe-down with a suitable cleaning solution can prevent mold from establishing itself. Addressing any leaks or water damage promptly can also minimize the risk of mold growth.
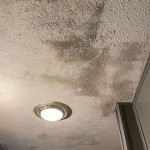
Identifying and Addressing Underlying Moisture Issues
Sometimes, persistent mold growth can indicate underlying moisture problems. Leaking pipes, inadequate ventilation, or water damage can create a conducive environment for mold. Addressing these issues is crucial for long-term mold prevention. Consult a professional plumber if necessary to identify and resolve any leaks or plumbing issues.

How To Remove Mold From Shower Caulk Or Tile Grout Fabulously Clean

How To Remove Mold From Shower Caulking Home Like You Mean It

How To Remove Mold From Caulk Frugally

How To Remove Mold From Shower Caulking Tips Tricks And Secrets

How To Get Mold Out Of Shower Caulk Hometalk

How To Remove Mold From Shower Caulking Tips Tricks And Secrets

I Found Mold In The Shower Caulking What Should Do

How To Remove Mold From Shower Caulking Tips Tricks And Secrets

How To Replace Bathroom Caulking Remove Mold Completely Diy Re

How To Get Rid Of Black Mold In Your Shower Caulking Remover Bathroom Cleaning S Remove From
Related Posts