Removing an Old Bathroom Vanity for a Fresh Update
Updating your bathroom can involve replacing the vanity, which can give your space a whole new look and feel. While removing an old vanity might seem daunting, it's a task that can be tackled with the right tools and a bit of preparation. Follow these steps to safely and effectively remove your old bathroom vanity:Step 1: Prepare the Workspace:
Clear the vanity of any personal items, toiletries, and accessories. Disconnect water supply lines by turning off the water at the shut-off valves and loosening the supply lines connected to the faucets. Spread a drop cloth on the floor to protect it from water and debris.Step 2: Disconnect Plumbing and Fixtures:
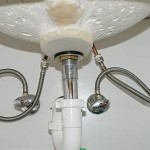
Disconnect the drainpipe from the P-trap by loosening the slip nuts. Unscrew the mounting bolts that secure the faucet to the countertop and disconnect the faucet supply lines. Remove the faucet and lift it off the countertop.Step 3: Remove the Countertops:
Countertop materials vary, but most vanities have laminate or stone countertops. If the countertop is laminate, it can be carefully pried off. For stone countertops, use a chisel and hammer to carefully break the countertop into smaller pieces for easier removal.Step 4: Detach the Vanity Cabinet:
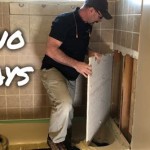
The vanity cabinet is typically secured to the wall by screws or bolts. Locate these connections and remove them. Gently pull the vanity away from the wall, being mindful of any plumbing or electrical connections still attached.Step 5: Check for Hidden Connections:
Inspect the wall and floor for any hidden screws or bolts that may have been missed. Remove any remaining screws or bolts to ensure the vanity is completely free.Step 6: Lift and Dispose of the Vanity:
Carefully lift the vanity cabinet and carry it out of the bathroom. Dispose of the vanity responsibly according to your local regulations. If the vanity is heavy or awkward, consider hiring a professional to assist with its removal.Step 7: Clean Up and Prepare for Installation:
Clean the floor and walls of any debris or leftover adhesive. Repair any holes or damage caused during the removal process. Prepare the space for the installation of your new vanity by ensuring the plumbing and electrical connections are accessible.Additional Tips:
- Safety first: Wear gloves and safety glasses when working with tools. Disconnect all water and electrical connections before removing any components. - Use a utility knife to carefully cut through any caulk or adhesive around the vanity and countertop. - If the vanity is particularly heavy, use a dolly or hand truck to transport it. - If you encounter any difficulties or uncertainties during the removal process, don't hesitate to consult a professional plumber or contractor.
How To Remove A Bathroom Vanity Budget Dumpster

How To Remove A Bathroom Vanity Remodel

How To Remove A Bathroom Vanity And Sink

How To Remove An Old Bathroom Vanity Thrift Diving Blog

How To Remove A Bathroom Vanity Remodel

Diy Guide Find Out How To Replace A Bathroom Sink Ron Hazelton

How To Remove Your Bathroom Sink And Vanity Dumpsters Com


How To Remove Replace A Vanity Top Easy Bathroom Sink Remodel

Replace Vanity Top And Faucet Diy Network
Related Posts