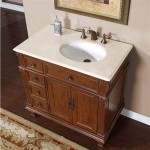
How to Repair a Leaking Single Handle Bathroom Faucet
Leaking faucets are a common problem that can waste water and increase utility bills. While it may seem like a daunting task, repairing a leaking single handle bathroom faucet is a relatively simple project that can be completed in just a few hours with the right tools and materials.
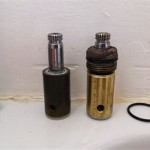
Before you begin, it's important to understand the different parts of a single handle bathroom faucet. The handle is connected to a cartridge or stem, which controls the flow of water. The cartridge or stem is sealed with O-rings, which can become worn or damaged over time, causing leaks.
To repair a leaking single handle bathroom faucet, you will need the following tools and materials:
- Phillips head screwdriver
- Adjustable wrench
- Replacement cartridge or stem
- O-rings
- Plumber's putty
Let's proceed with the steps on how to fix a leaking single-handle bathroom faucet.
Step 1: Turn off the water supply
The first step is to turn off the water supply to the faucet. There are usually two shut-off valves, one for hot water and one for cold water, located under the sink. Turn both valves clockwise to turn off the water.
Step 2: Remove the handle
Once the water supply is turned off, you can remove the handle. There is usually a small set screw on the side of the handle. Use a Phillips head screwdriver to remove the set screw, then pull the handle straight up to remove it.
Step 3: Remove the cartridge or stem
Once the handle is removed, you will need to remove the cartridge or stem. There is usually a nut that holds the cartridge or stem in place. Use an adjustable wrench to loosen the nut, then pull the cartridge or stem straight out.
Step 4: Inspect the O-rings
Once the cartridge or stem is removed, you can inspect the O-rings for wear or damage. If the O-rings are worn or damaged, they will need to be replaced.
Step 5: Install the replacement cartridge or stem
If the O-rings are in good condition, you can install the replacement cartridge or stem. Apply a small amount of plumber's putty to the base of the cartridge or stem, then insert it into the faucet body.
Step 6: Reinstall the handle
Once the cartridge or stem is installed, you can reinstall the handle. Push the handle straight down onto the cartridge or stem, then tighten the set screw.
Step 7: Turn on the water supply
Once the handle is reinstalled, you can turn on the water supply. Check for leaks around the base of the faucet and around the handle. If there are no leaks, the repair is complete.
Repairing a leaking single handle bathroom faucet is a relatively simple project that can be completed in just a few hours with the right tools and materials. By following these steps, you can save money and avoid the hassle of calling a plumber.

How To Repair A Leaky Lavatory Faucet

How To Fix A Leaky Tub Shower Faucet

How To Fix A Leaky Single Handle Tub Shower Faucet Danco

How To Rebuild A Delta Single Handle Faucet

How To Fix A Leaky Single Handle Sink Faucet

How To Fix A Leaky Bathroom Sink Faucet

How To Fix A Leaky Faucet True Value

Is Your Ceramic Disc Faucet Leaking Here S How To Clean Fix It

How To Repair A Leaky Single Lever Moen Bath Or Shower Faucet Older Style

Bathroom My Single Handle Faucet Is Leaking Or Dripping
Related Posts