How To Repair Moen Bathroom Faucet: Essential Aspects
Noun: Repair Understanding the essential aspects of repairing a Moen bathroom faucet is crucial to successfully restore its functionality. This comprehensive article will delve into the core elements of the repair process, providing a step-by-step guide to identify the problem, gather the necessary tools, troubleshoot common issues, and execute the repair effectively. ### Identifying the Problem The first step in repairing a Moen bathroom faucet is to identify the underlying problem. Common issues include leaks, dripping, low water pressure, and handle malfunctions. By observing the symptoms and inspecting the faucet, you can pinpoint the source of the problem, whether it's a worn washer, a faulty cartridge, or a loose connection. ### Gathering the Necessary Tools Once the problem has been identified, gather the necessary tools for the repair. Essential tools include a Phillips head screwdriver, a flat head screwdriver, an adjustable wrench, a pair of pliers, and a cloth or sponge. Having the right tools on hand will streamline the repair process and prevent unnecessary delays. ### Troubleshooting Common Issues Before attempting the repair, troubleshoot common issues that may be causing the faucet problems. Check for loose connections, inspect the aerator for clogs, and verify that the water supply is adequate. Addressing these simple issues can often resolve the problem without the need for extensive repair. ### Step-by-Step Repair With the problem identified and the tools gathered, proceed with the step-by-step repair. The specific steps will vary depending on the issue, but generally involve disassembling the faucet, replacing faulty parts, and reassembling the faucet. Follow the manufacturer's instructions carefully to ensure proper installation and functionality. ### Tips for Success To increase the success of the repair, consider these tips: - Use original Moen parts to ensure compatibility and longevity. - Apply plumbers tape to all threaded connections to prevent leaks. - Test the faucet thoroughly after the repair to ensure proper operation. ### Conclusion By understanding the essential aspects of repairing a Moen bathroom faucet, you can tackle the task with confidence. This article provides a comprehensive guide to identify the problem, gather the necessary tools, troubleshoot common issues, and execute the repair effectively. With patience and attention to detail, you can restore your Moen bathroom faucet to optimal functionality and enjoy a trouble-free water flow.
How To Fix A Dripping Moen Faucet Howtolou Com

How To Repair Moen Bathroom Faucet Dripping Water Cartridge Removal Replace Single Lever

How To Replace Repair A Leaky Moen Cartridge In Bathroom Set Of Faucets Single Lever Tips

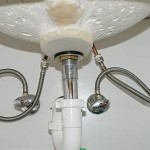
How Do I Replace My Moen Bathroom Faucet Cartridge

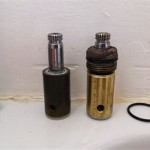
Moen Bathroom Faucet Repair 1225

How To Fix Moen Single Handle Faucets

How To Remove Moen Bathroom Faucet Handle In 2 Steps

Easy Moen Bathroom Faucet Drip Repair

How To Fix A Leaky Moen Faucet Fast And Easy Cartridge Replacement

How To Fix Moen Single Handle Faucets