How to Repair Moen Single Handle Bathroom Sink Faucet
Moen single handle bathroom sink faucets are known for their durability and ease of use. However, even the most well-made faucets can eventually develop problems. If your Moen faucet is leaking, dripping, or not working properly, you may be able to repair it yourself with a few simple tools and parts.
Tools and Parts You'll Need
- Adjustable wrench
- Phillips screwdriver
- Flathead screwdriver
- Replacement cartridge
- O-rings
Step-by-Step Repair Instructions
1. Turn Off the Water Supply
The first step is to turn off the water supply to the faucet. There are usually two shut-off valves located under the sink, one for hot water and one for cold water. Turn both valves clockwise to turn off the water.
2. Remove the Handle
Once the water supply is turned off, you can remove the handle. On most Moen faucets, the handle is held in place by a small screw. Use a Phillips screwdriver to remove the screw, then pull the handle straight up to remove it.
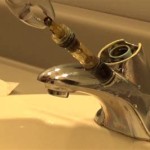
3. Remove the Cartridge
With the handle removed, you can now access the cartridge. The cartridge is a cylindrical-shaped component that controls the flow of water through the faucet. Use an adjustable wrench to loosen the nut that holds the cartridge in place. Once the nut is loose, you can pull the cartridge straight out.
4. Replace the Cartridge
Inspect the old cartridge for any damage or wear. If the cartridge is damaged, it will need to be replaced. To replace the cartridge, simply push the new cartridge into the faucet body and tighten the nut. Make sure that the cartridge is seated properly before tightening the nut.
5. Replace the O-Rings
The O-rings are small rubber gaskets that help to create a watertight seal between the cartridge and the faucet body. Over time, O-rings can become worn or damaged, which can lead to leaks. To replace the O-rings, simply remove the old O-rings and replace them with new ones.
6. Reassemble the Faucet
Once the cartridge and O-rings have been replaced, you can reassemble the faucet. Start by inserting the cartridge into the faucet body. Then, tighten the nut that holds the cartridge in place. Next, place the handle on the faucet and secure it with the screw. Finally, turn on the water supply and check for leaks.
7. Troubleshooting
If you are still experiencing problems with your Moen faucet after following these instructions, there may be a more serious problem that requires the assistance of a qualified plumber.

How To Fix Moen Single Handle Faucets

How To Fix Moen Single Handle Faucets

How To Replace Repair A Leaky Moen Cartridge In Bathroom Set Of Faucets Single Lever Tips

Moen Bathroom Faucet Repair 1225

Moen Bathroom Faucet Repair 1225

Moen Adler 4 Inch Centerset Single Handle Bathroom Faucet Replacement Ifixit Repair Guide

How To Fix Moen Single Handle Faucets

How To Fix Moen Single Handle Faucets

How To Fix A Leaky Faucet Kitchen Repair Moen Bathroom Faucets

How To Fix A Dripping Moen Faucet Howtolou Com
Related Posts