How to Effortlessly Replace a Bathroom Sink Bowl
Replacing a bathroom sink bowl is a relatively straightforward task that can be completed in a few hours. The key to a successful installation is to ensure that the new bowl is properly fitted and sealed to prevent leaks and ensure a clean and functional bathroom space.
Before You Start
Before you begin, gather the necessary tools and materials:
- New bathroom sink bowl
- Sink strainer
- Faucet
- Plumber's putty
- Adjustable wrench
- Basin wrench
- Screwdriver
- Pliers
- Measuring tape
Step-by-Step Instructions
1. Remove the Old Sink
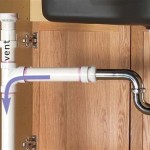
Start by shutting off the water supply to the sink. Disconnect the water supply lines and loosen the nuts holding the faucet in place. Carefully lift the old sink out of the cabinet or countertop.
2. Clean and Prepare the Sink Opening
Clean the area where the old sink was installed, removing any old caulk or sealant. Measure the opening to ensure that the new sink will fit properly.
3. Apply Plumber's Putty
Apply a bead of plumber's putty around the rim of the drain hole on the underside of the new sink. This will create a watertight seal.
4. Install the Sink
Carefully place the new sink into the opening, aligning it with the drain hole. Gently press the sink into place, ensuring that the putty forms a seal around the drain.
5. Tighten the Mounting Nuts
Tighten the mounting nuts on the underside of the sink to secure it to the cabinet or countertop. Avoid overtightening, as this could crack the sink.
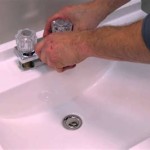
6. Install the Faucet
Connect the faucet to the water supply lines and tighten the nuts to secure it. Turn on the water supply and check for any leaks.
7. Install the Sink Strainer
Place the sink strainer over the drain hole and tighten the nut to hold it in place. This will prevent debris from entering the drain.
8. Caulk Around the Sink
Apply a bead of caulk around the edge of the sink to create a watertight seal between the sink and the countertop or cabinet.
Tips for a Flawless Installation
* Use a level to ensure that the new sink is installed evenly. * Don't overtighten the mounting nuts or faucet connections, as this could damage the sink or plumbing. * If you encounter any leaks, tighten the connections or apply additional caulk. * Allow the caulk to dry completely before using the sink.
How To Replace Vessel Bathroom Sink

How To Fit A Bathroom Sink Diy Guides Victorian Plumbing

Diy How To Replace Undermount Bathroom Sink Bowl

How To Replace And Install A Bathroom Sink

How To Replace A Drop In Bathroom Sink Step By

Wickes How To Fit A Basin Taps

Diy How To Replace Undermount Bathroom Sink Bowl

How To Install A Vessel Sink

How To Install A Vessel Sink Step By Instructions

How To Install A Bathroom Sink Or Basin Victoriaplum Com
Related Posts