Replacing a Delta Bathroom Faucet Washer: A Comprehensive Guide
When your Delta bathroom faucet starts leaking from the handle, it's often a sign that the washer needs to be replaced. Replacing a washer is a relatively straightforward task that can be completed in a few minutes with the right tools and materials. Here's a step-by-step guide to help you get the job done:
Tools and Materials
- Replacement washer (size 33-6110)
- Screwdriver (Phillips head)
- Adjustable wrench
- Plumber's putty (optional)
Step 1: Turn Off the Water Supply
Before you start, turn off the water supply to the faucet. This will prevent water from leaking out while you're working.
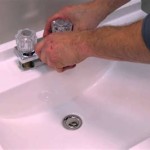
Step 2: Remove the Handle
Use a screwdriver to remove the screw that holds the handle in place. Once the screw is removed, you can pull the handle straight off the stem.
Step 3: Remove the Stem Washer
Behind the handle, you'll see a brass or plastic stem. Use an adjustable wrench to loosen the packing nut that holds the stem in place. Be careful not to overtighten the packing nut.
Step 4: Remove the Seat Washer
Once the stem is loose, you can use your screwdriver to pry out the old seat washer. The seat washer is the rubber washer that sits on the top of the stem.
Step 5: Install the New Seat Washer
Place the new seat washer on top of the stem. Make sure that the washer is seated properly and that it's facing the right direction.
Step 6: Reassemble the Faucet
Tighten the packing nut on the stem. Don't overtighten the packing nut, or you could damage the stem. Replace the handle and tighten the screw that holds it in place.
Step 7: Turn On the Water Supply and Check for Leaks
Turn on the water supply and check for leaks. If there are any leaks, tighten the packing nut on the stem until the leak stops. You may also need to apply plumber's putty to the base of the handle to prevent leaks.
Tips
- If you're not sure what size washer you need, you can take the old washer to a hardware store and match it up.
- If the packing nut is too tight, you can use a wrench to loosen it.
- If you're having trouble removing the stem, you can try using a pair of pliers.
- If the leak is coming from the base of the faucet, you may need to replace the O-rings.
Conclusion
Replacing a Delta bathroom faucet washer is a simple task that can be completed in a few minutes. By following the steps in this guide, you can save yourself time and money on a professional repair.

How To Rebuild A Delta Single Handle Faucet

How To Fix Leaky Bathroom Handle Delta Faucet Model 4530 Series Hard Water

Dripping Delta Faucet Replacing Washers

How To Repair Leaking Dripping Delta Faucet Diyplumbing Serviceplumbing Tappplumbing

Learn How To Fix A Leaky Faucet Delta Bathroom

Simple Ways To Fix A Leaky Delta Bathroom Sink Faucet

My 1300 1400 Series Monitor Is Leaking From The Shower Head Or Spout When Handle Off What Do I Need

Learn How To Fix A Leaky Faucet Delta Bathroom

Repairing A Leaky Delta Bath Or Shower Faucet Single Lever And Setting Temp

How To Fix A Leaky Delta Style Bathroom Faucet
Related Posts