Replacing a Wall-Mounted Bathroom Sink
Replacing a wall-mounted bathroom sink is a relatively straightforward task that can be completed in a few hours with the right tools and materials. By following these steps, you can save yourself the cost of hiring a plumber and have your new sink installed in no time.
Materials Needed:
- New wall-mounted bathroom sink
- Mounting brackets
- Screws and bolts
- Caulk
- Basin wrench
- Phillips screwdriver
- Level
Step 1: Remove the Old Sink
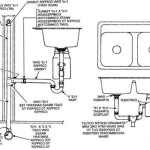
Begin by turning off the water supply to the sink and disconnecting the drain line. Use a basin wrench to loosen the nuts that hold the sink to the wall, then carefully remove the sink from the brackets. The weight of the sink may pull on the bolts in the wall, so be prepared to support it as it comes loose.
Step 2: Install the Mounting Brackets
Align the mounting brackets with the holes in the wall and mark the mounting locations with a pencil. Drill pilot holes at the marked locations, then secure the brackets to the wall using screws and bolts. Make sure that the brackets are level and securely fastened.
Step 3: Mount the New Sink
Lift the new sink into place and align it with the mounting brackets. Carefully tighten the nuts that hold the sink to the brackets until it is snug. Use a level to ensure that the sink is level both left to right and front to back.
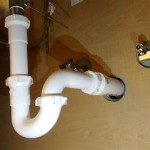
Step 4: Reconnect the Plumbing
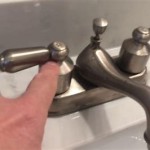
Connect the drain line to the sink and secure it with a slip nut. Turn on the water supply and check for leaks at the drain connection and the faucet. If any leaks are present, tighten the connections until the leaks stop.
Step 5: Caulk the Sink
Apply a generous bead of caulk around the edges of the sink where it meets the wall. Use your finger or a caulk tool to smooth out the caulk and remove any excess. The caulk will help to prevent water from seeping behind the sink and causing damage.
Step 6: Clean Up
Remove any debris from the work area and inspect your work. Once you are satisfied with the installation, turn on the water and check for any leaks. If there are no leaks, you have successfully replaced the wall-mounted bathroom sink.
By following these steps, you can save yourself the cost of hiring a plumber and replace the wall-mounted bathroom sink in your home with ease.

How To Remove And Install A Wall Mounted Sink In 2 Steps

Installing A Bathroom Sink Wall Hung Diy Family Handyman

Wall Mount Sink Installation All Step By Instructions

Wall Hung Bathroom Sink Install Guide

How To Install A Wall Mounted Pedestal Sink Step By

Fitting A Wall Hung Basin On Stud Bathroom Guru

Fitting A Wall Hung Basin In Bathroom Guru

Wall Mounted Sink New Life Jaime Costiglio

Diy Wall Mounted Sink Install 2

Here S How Install A Bathroom Pedestal Sink
Related Posts