How to Replace a Bathroom Sink Counter: A Comprehensive Guide
Replacing a bathroom sink counter is a home improvement project that can significantly enhance the aesthetics and functionality of your bathroom. While it requires some preparation and materials, it's a task that can be tackled by most DIY enthusiasts with the right tools and guidance. Follow this comprehensive guide to learn how to replace a bathroom sink counter step-by-step.
Materials and Tools Required:
- New bathroom sink counter
- Caulk gun and silicone caulk
- Plumber's putty or adhesive
- Utility knife
- Tape measure
- Level
- Wrench
- Drill
- Screws
Step 1: Preparation and Safety Precautions
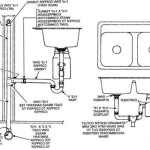
Before starting the replacement process, it's important to prepare the workspace and take necessary safety precautions. Turn off the water supply to the sink and disconnect the supply lines. Clear the area around the sink, including any items beneath it. Wear protective gloves and eye wear to minimize the risk of injury.
Step 2: Remove the Existing Counter
Using a utility knife, carefully cut the caulk around the sink and counter. Disconnect the sink from the countertop by unscrewing the mounting screws beneath it. Support the counter as you lift it off the vanity base. If the counter is heavy or awkward, seek assistance from another person.
Step 3: Clean and Prepare the Vanity Base
Once the old counter is removed, thoroughly clean the vanity base and remove any remaining residue or debris. Check for any damage to the base and repair if necessary. Use caulk to fill any gaps or holes around the sink opening.
Step 4: Install the New Counter
Place the new counter over the vanity base and align it evenly. Use a level to ensure it's level in all directions. Secure the counter to the base by drilling pilot holes and driving in screws. Apply a thin bead of caulk around the edge of the counter where it meets the vanity base.
Step 5: Reconnect the Sink
Apply a bead of plumber's putty or adhesive around the base of the sink. Place the sink into the counter opening and carefully tighten the mounting screws. Use a level to ensure the sink is level. Reconnect the water supply lines and turn the water on to check for leaks.
Step 6: Seal and Caulk
Apply a bead of silicone caulk around the edges of the sink where it meets the counter. Smooth out the caulk using a finger or a caulk tool. This will create a waterproof seal and prevent moisture from seeping into the base. Allow the caulk to dry completely.
Step 7: Finishing Touches
Once the caulk has dried, remove any excess and clean the counter surface. Replace any fixtures or accessories that were removed during the replacement process. Enjoy your newly updated bathroom sink counter.
Tips for Success:
- Measure accurately before purchasing a new counter. It should be slightly shorter than the width of the vanity base.
- Use a level frequently to ensure the counter and sink are installed evenly.
- Apply caulk liberally to prevent water damage.
- Allow the caulk to dry completely before using the sink.

Replace Vanity Top And Faucet Diy Network

How To Remove Replace A Vanity Top Easy Bathroom Sink Remodel

How To Replace A Bathroom Countertop Homeadvisor

Diy Replace Vanity Top

Replace Granite Countertops Transform Your Bathroom S Look

How To Remove A Countertop From Vanity Decor Adventures

Install A Solid Surface Bathroom Vanity Top Replace Countertop

Replace Vanity Top And Faucet Diy Network

Diy Guide Find Out How To Replace A Bathroom Sink Ron Hazelton

How To Replace A Vanity Top And Save Craving Some Creativity
Related Posts