How To Replace Bathroom Sink Faucet Cartridge
Replacing the bathroom sink faucet cartridge is a common plumbing repair that can fix many of the most common issues with your faucet. The cartridge is responsible for controlling the flow of water and mixing the hot and cold water together. If the cartridge becomes worn or damaged, it can cause leaks, drips, or other problems.
Replacing the faucet cartridge is a relatively simple job that can be completed in a few hours. The following step-by-step guide will show you how to do it.
Step 1: Turn Off the Water Supply
Before you start, you need to turn off the water supply to the sink. There are usually two shut-off valves located under the sink, one for the hot water and one for the cold water. Turn both valves clockwise to close them.
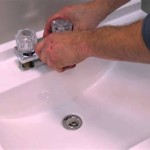
Step 2: Remove the Faucet Handle
Once the water supply is turned off, you can remove the faucet handle. There is usually a small screw or cap that holds the handle in place. Remove the screw or cap and pull the handle off.
Step 3: Remove the Faucet Cartridge
Once the handle is removed, you will see the faucet cartridge. The cartridge is usually held in place by a nut or a retainer clip. Use a wrench to loosen the nut or remove the retainer clip. Once the cartridge is loose, you can pull it out of the faucet body.
Step 4: Inspect the Cartridge
Once the cartridge is removed, inspect it for damage. If the cartridge is worn or damaged, it will need to be replaced. If the cartridge is not damaged, you can clean it and reinstall it.
Step 5: Install the New Cartridge
If the cartridge needs to be replaced, insert the new cartridge into the faucet body. Make sure that the cartridge is properly seated in the faucet body. Tighten the nut or replace the retainer clip to hold the cartridge in place.
Step 6: Reinstall the Faucet Handle
Once the cartridge is installed, you can reinstall the faucet handle. Push the handle onto the faucet body and tighten the screw or cap to hold it in place.
Step 7: Turn on the Water Supply
Finally, turn on the water supply to the sink. Check for leaks around the faucet. If there are no leaks, then you have successfully replaced the faucet cartridge.
Tips
Here are a few tips for replacing the bathroom sink faucet cartridge:
- Use the correct tools. You will need a wrench to loosen the nut or remove the retainer clip and a screwdriver to remove the screw or cap that holds the handle in place.
- Be careful not to damage the faucet body when removing the cartridge.
- If you are not comfortable replacing the faucet cartridge yourself, you can call a plumber to do it for you.

Quickly Replace A Leaky Faucet Cartridge Diy Family Handyman

Bathroom Faucet Cartridge Replacement

How To Replace Leaky Cartridges In A Bathroom Faucet Repair

How To Replace Repair A Leaky Moen Cartridge In Bathroom Set Of Faucets Single Lever Tips

Replacing A Faucet Cartridge Elkay S Step By Guide

Gerber How To Install A Cartridge

Hot And Cold Ceramic Disc Brass Bathroom Sink Faucet Valve Stem Repair Cartridge Replacement Kitchen Temu United Kingdom

How To Fix A Leaky 2 Handle Faucet Replace Bathroom Sink Repair

Hot And Cold Ceramic Disc Brass Bathroom Sink Faucet Valve Stem Repair Cartridge Replacement Kitchen Temu Spain

How To Change A Glacier Bay Bathroom Faucet Cartridge Diy Home Repair