How to Replace a Bathroom Sink Water Shut-Off Valve
Replacing a water shut-off valve is a relatively easy plumbing task that can be completed in under an hour with minimal tools and expertise. Whether you're dealing with a leaking faucet or need to replace an outdated valve, follow these step-by-step instructions to get the job done right.
Tools You'll Need:
- Adjustable wrench or pliers
- Phillips head screwdriver
- Replacement water shut-off valve
- Teflon tape
- Bucket or towel
Safety Precautions:
Before you begin, ensure you have ample space to work and minimize the risk of water damage. Turn off the main water supply and open the bathroom faucet to release any residual water. Protect your work area with a bucket or towel to catch any spills or debris.
Step-by-Step Instructions:
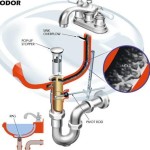
- Locate the Water Shut-Off Valves: Typically, bathroom sinks have two water shut-off valves, one for hot water and one for cold water. They are usually located under the sink, connected to the water supply lines.
- Turn Off the Water: Using an adjustable wrench or pliers, carefully turn the water shut-off valves clockwise to close them. Double-check that there's no water flow by opening the bathroom faucet.
- Disconnect the Water Supply Lines: Using another adjustable wrench or pliers, loosen the nuts connecting the water supply lines to the water shut-off valves. Remove the water supply lines by hand.
- Remove the Old Shut-Off Valve: Using a Phillips head screwdriver, unscrew the mounting screws that secure the water shut-off valve to the sink. Grip the valve firmly and gently pull it upward to disconnect it from the water supply lines.
- Install the New Shut-Off Valve: Apply Teflon tape to the threads of the new water shut-off valve in a clockwise direction. Slide the valve onto the water supply lines and hand-tighten it. Use an adjustable wrench to further tighten the valve, ensuring it's secure but not over-tightened.
- Reconnect the Water Supply Lines: Slide the nuts from the water supply lines onto the new water shut-off valve and hand-tighten them as much as possible. Use an adjustable wrench or pliers to further tighten the nuts, ensuring they are secure but not cross-threaded.
- Turn On the Water: Slowly turn on the main water supply and check for any leaks around the new water shut-off valve and water supply line connections. If there are leaks, further tighten the nuts or valve as needed.
Conclusion:
Replacing a bathroom sink water shut-off valve is a straightforward and manageable task that can be completed in a short amount of time. By following these step-by-step instructions and adhering to safety precautions, you can ensure a successful outcome and avoid potential water damage in your bathroom.

How To Install Water Shut Off Valve For Sinks

How To Replace A Leaking Shutoff Valve Under Sink

How To Install A New Bathroom Water Supply Shutoff Valve

How To Replace A Shut Off Valve Under Your Sink

How To Replace A Shutoff Valve Diy Family Handyman

How To Fix A Leaking Water Supply Shut Off Valve Easy Diy For Beginners

Handle Broke Off On Shut Valve Under Sink Diy Plumbing Repair Bathroom

Condo Blues How To Replace Plumbing Valves Without Soldering

How To Install A Water Shut Off Valve 9 Minutes Home Repair Tutor

Replace Bathroom Sink Shut Off Valve
Related Posts