How to Replace a Delta Bathroom Faucet Cartridge
Replacing a Delta bathroom faucet cartridge is an essential task for maintaining the proper functioning of your faucet. The cartridge controls the flow of water and temperature, so it's important to keep it in good condition to avoid leaks or other problems. Replacing the cartridge is a relatively simple process that can be completed in about 30 minutes.
Parts of a Delta Bathroom Faucet
- Handle: The handle is what you use to turn the water on and off and adjust the temperature.
- Escutcheon: The escutcheon is the decorative plate that covers the base of the faucet.
- Stem: The stem is the metal rod that connects the handle to the cartridge.
- Cartridge: The cartridge is the heart of the faucet and controls the flow of water and temperature.
- O-rings: O-rings are rubber seals that help to prevent leaks.
Tools You'll Need
- Phillips head screwdriver
- Adjustable wrench
- Replacement cartridge for your specific Delta faucet model
Step-by-Step Instructions
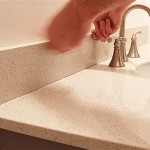
- Turn off the water supply to the faucet. There will be two shut-off valves under the sink, one for hot water and one for cold water. Turn both valves clockwise to turn off the water.
- Remove the handle. Most Delta faucets have handles that are held in place by a screw. Use a Phillips head screwdriver to remove the screw, then pull the handle straight up to remove it.
- Remove the escutcheon. The escutcheon is usually held in place by two screws. Use a Phillips head screwdriver to remove the screws, then pull the escutcheon straight up to remove it.
- Unscrew the stem. The stem is usually held in place by a packing nut. Use an adjustable wrench to loosen the packing nut, then unscrew the stem by turning it counterclockwise.
- Remove the old cartridge. The old cartridge will be held in place by two O-rings. Carefully pry the old cartridge out of the faucet body using a flathead screwdriver.
- Install the new cartridge. Insert the new cartridge into the faucet body and make sure that the O-rings are in place. Push the cartridge in until it is fully seated.
- Re-install the stem. Screw the stem back into the faucet body and tighten the packing nut using an adjustable wrench.
- Re-install the escutcheon. Slide the escutcheon back over the faucet body and tighten the screws.
- Re-install the handle. Slide the handle back onto the stem and tighten the screw.
- Turn on the water supply to the faucet. Check for leaks and adjust the packing nut as needed.
Troubleshooting
- If the faucet is leaking, it may be necessary to replace the O-rings.
- If the water temperature is not correct, it may be necessary to adjust the cartridge.
- If the handle is loose, it may be necessary to tighten the screw that holds it in place.

How To Replace The Cartridge In A Single Handle Delta Faucet Repair

How To Replace A Delta Faucet Shower Cartridge Diy Plumbing Repair

Delta Faucet Cartridge Repair

How To Replace A Delta Cartridge And Fix Leaky Bathtub Faucet It Tutorials

How To Replace Leaky Cartridges In A Bathroom Faucet Repair

How To Replace A Delta Tub Or Shower Cartridge

Repairing A Leaky Delta Bath Or Shower Faucet Single Lever And Setting Temp

Replacing Delta Shower Cartridge

How To Install A Shower Valve Cartridge With Photos Clean The Bonnet Nut And Threads Then Faucet Repair Delta Kitchen

Quickly Fix A Leaky Faucet Cartridge Repair
Related Posts