How to Replace Grout in Bathroom Tiles Like a Pro
Grout, the substance that fills the gaps between bathroom tiles, is essential for both aesthetics and functionality. Over time, grout can become discoloured, cracked, or mouldy, compromising the overall appearance and hygiene of your bathroom. If you're looking to revitalize your bathroom tiles, replacing the grout is a task you can tackle yourself with some preparation and the right tools.
Tools and Materials You'll Need:
- Grout removal tool or oscillating tool with grout blade
- Grout float or squeegee
- Sponge or cloth
- Bucket of water
- Grout cleaner (optional)
- New grout
- Grout sealer (optional)
Step 1: Remove the Old Grout
Using a grout removal tool or an oscillating tool with a grout blade, carefully remove the old grout from between the tiles. Be cautious not to damage the tiles or surrounding surfaces. If the grout is particularly stubborn, you can use a grout cleaner to soften it before removal.
Step 2: Clean the Tile Surface
Once the old grout is removed, clean the tile surface thoroughly with a sponge or cloth and a bucket of water. Remove any remaining grout residue or dirt to ensure proper adhesion of the new grout.
Step 3: Mix the New Grout
Follow the manufacturer's instructions to mix the new grout. The consistency should resemble that of peanut butter, not too runny or too thick. Mix only enough grout for a small area at a time, as it sets quickly.
Step 4: Apply the Grout
Using a grout float or squeegee, apply the new grout to the cleaned tile surface. Press firmly to ensure the grout fills the gaps completely. You can use a damp sponge to wipe away excess grout as you go.
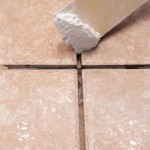
Step 5: Smooth and Shape the Grout
After applying the grout, use the grout float or squeegee to smooth and shape the surface. This will remove any excess grout and create a clean, uniform finish. You can also use a damp sponge to refine the edges and create a slightly concave shape to prevent water from collecting.
Step 6: Remove Excess Grout
Once the grout has set slightly (usually within 15-30 minutes), wipe away any excess grout from the tile surface using a damp sponge. Be gentle to avoid removing the grout from the joints. Rinse the sponge frequently to prevent spreading old grout onto the new grout.
Step 7: Let the Grout Cure
Allow the grout to cure completely according to the manufacturer's instructions. This can take anywhere from 24 to 72 hours. Keep the area dry and free from traffic during this time to ensure the grout sets properly.
Step 8: Seal the Grout (Optional)
For added protection, you can apply a grout sealer after the grout has fully cured. This will help prevent stains and moisture penetration, making the grout more durable and easier to maintain. Follow the manufacturer's instructions for applying the grout sealer.
Tips for Success:
- Test the grout colour on an inconspicuous area before applying it to the entire surface.
- Work in small sections at a time to prevent the grout from setting before you can finish smoothing it out.
- Don't overwork the grout. Too much manipulation can weaken its bond and make it more prone to cracking.
- Use a sponge that is slightly damp, not soaking wet. Excess water can dilute the grout and compromise its strength.
- Allow the grout to cure completely before exposing it to water or heavy traffic.

How To Regrout Bathroom Tile In 5 Easy Steps True Value

How To Prevent Expensive Bathroom Shower Tile And Grout Repair Promaster Home Handyman

Can I Put New Grout Over My Old The Medic

How Do I Know If Need To Regrout My Shower The Grout Medic

Is Ed Grout A Problem Repair Easy The Medic

Quick Fix Repair Ed Bathroom Grout

How To Repair Ed Tile Grout An Easy Guide The Lived In Look

How To Replace Moldy Grout

How To Fix Holes In Shower Grout The Experts

Six Easy Steps To Regrout Bathroom Tiles For A Show Home Finish Prevent Mould Express Co
Related Posts