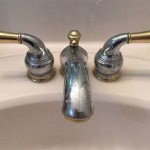
How to Replace a Moen Bathroom Sink Faucet
Replacing a Moen bathroom sink faucet is a relatively straightforward plumbing project that can be tackled by most homeowners with basic DIY skills. This guide provides a comprehensive step-by-step process to help you successfully replace your old faucet with a new Moen model.
Step 1: Gather Tools and Materials
Before you begin, ensure you have the necessary tools and materials at hand. This will make the process smoother and more efficient. Here's a list of what you'll need:
- New Moen bathroom sink faucet
- Adjustable wrench
- Channel-lock pliers
- Phillips screwdriver
- Flathead screwdriver
- Plumber's tape (Teflon tape)
- Basin wrench (optional)
- Bucket
- Rag or towel
- Safety glasses
- Gloves (optional)
Step 2: Turn Off the Water Supply
Safety is paramount in plumbing work. Before dismantling the faucet, it's crucial to turn off the water supply. Locate the shut-off valves for the hot and cold water lines leading to the sink. Typically, these valves are located under the sink or on the wall adjacent to the sink. Turn the valves clockwise to shut off the water flow.
Step 3: Drain the Water Lines
To prevent water from spilling during the removal process, drain the remaining water from the supply lines. Open the faucet handles fully to allow any residual water to drain. You can also use a small bucket to catch the water as it drains.
Step 4: Disconnect the Old Faucet
Now that the water supply is shut off and the lines are drained, you can proceed to disconnect the old faucet. Here's how:
- Remove the faucet handles: Use a Phillips screwdriver to remove any screws securing the faucet handles. Gently pull the handles off.
- Disassemble the pop-up drain: If your sink has a pop-up drain, remove the drain stopper by unscrewing the cap on the drain assembly. Disconnect the pop-up rod from the faucet by unscrewing the nut that attaches it.
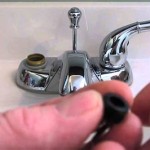
- Disconnect the supply lines: Use an adjustable wrench to loosen the nuts connecting the supply lines to the faucet. You may need to use a basin wrench, a specialized tool designed for this purpose, if the nuts are difficult to reach. Once loosened, gently pull the supply lines off the faucet.
- Remove the mounting nut: Locate the mounting nut beneath the faucet body. Use an adjustable wrench to loosen and remove the mounting nut. Be careful not to apply excessive force, as this could damage the sink.
- Remove the faucet body: With the mounting nut removed, gently lift the faucet body from the sink. Take note of the orientation of the faucet body and mounting plate for proper installation of the new faucet.
Step 5: Clean and Prepare the Sink
Before installing the new faucet, it's essential to clean the sink and surrounding area thoroughly. Remove any debris or old sealant. Use a damp cloth to wipe down the sink surface and the area where the faucet will be mounted.
Step 6: Install the New Faucet
Now it's time to install the new Moen faucet. Follow the instructions included with your new faucet, but the general steps are as follows:
- Install the mounting plate: Place the mounting plate provided with the new faucet over the hole in the sink. Make sure it's centered and aligned properly.
- Attach the faucet body: Align the faucet body with the mounting plate and insert it through the mounting hole. Secure it with the mounting nut, tightening it by hand initially.
- Connect the supply lines: Wrap the threads of the supply lines with plumber's tape to create a watertight seal. Connect the supply lines to the faucet body, making sure they are securely tightened with an adjustable wrench.
- Reconnect the pop-up drain: If your sink has a pop-up drain, reconnect the rod to the faucet and secure it with the nut.
- Attach the faucet handles: Replace the faucet handles and screw them back on securely.
Step 7: Turn on the Water Supply
After installing the new faucet, carefully turn the water supply back on. Start by slowly opening the valves for the hot and cold water lines. Check for any leaks at the connections.
Step 8: Test the Faucet
Once the water supply is turned on, test the new faucet thoroughly. Run hot and cold water through the faucet, ensuring it operates smoothly and without any leaks.

How To Fix A Dripping Moen Faucet Howtolou Com

How To Replace Repair A Leaky Moen Cartridge In Bathroom Set Of Faucets Single Lever Tips

Moen Faucet Stuck How To Remove A Monticello Tools For Removing Bathroom Facuet

How To Remove Moen Bathroom Faucet Handle In 2 Steps

How Do I Replace My Moen Bathroom Faucet Cartridge

How To Install A Moen Centerset Faucet

Bathroom Faucet Cartridge Replacement

Moen Bathroom Faucet Repair 1225

Install Moen Bathroom Sink Faucet And Drain

How To Install A New Bathroom Faucet In Pedestal Sink Moendiyer Simply Designing With Ashley
Related Posts