How To Replace Old Moen Bathroom Faucet
Replacing an old Moen bathroom faucet is a straightforward task that can be completed in a few hours. By following these simple steps, you can save yourself the cost of hiring a plumber and have a new faucet installed in no time.
Before you begin, gather the following tools and materials:
- New Moen bathroom faucet
- Adjustable wrench
- Plumber's putty
- Teflon tape
- Flashlight
Once you have your tools and materials, follow these steps to replace your old Moen bathroom faucet:
1. Turn off the water supply to the faucet.There are usually two water supply valves located under the sink. Turn both valves clockwise to shut off the water. If the sink is a double sink, you only need to turn off the valves for the faucet you are replacing.
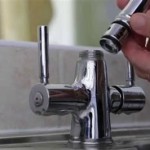
2. Disconnect the old faucet.Use the adjustable wrench to loosen the nuts that hold the faucet to the sink. Once the nuts are loose, you can lift the faucet off the sink.
3. Clean the sink.Use a damp cloth to clean the surface of the sink where the new faucet will be installed. This will help to ensure a good seal.
4. Apply plumber's putty.Roll a small piece of plumber's putty into a rope and place it around the base of the new faucet. This will help to seal the faucet to the sink.
5. Wrap the threads of the faucet with Teflon tape.Wrap the threads of the faucet with a few layers of Teflon tape. This will help to prevent leaks.
6. Install the new faucet.Place the new faucet in the hole in the sink and tighten the nuts to secure it. Do not overtighten the nuts, as this could damage the faucet.
7. Connect the water supply lines.Connect the water supply lines to the faucet. Make sure the hot and cold lines are connected to the correct sides of the faucet. Tighten the nuts on the water supply lines using the adjustable wrench.
8. Turn on the water supply.Turn on the water supply valves under the sink and check for leaks. If there are any leaks, tighten the nuts on the water supply lines or the base of the faucet. 9. Enjoy your new faucet!
Your new Moen bathroom faucet is now installed and ready to use. Enjoy the convenience of a new faucet and the satisfaction of a job well done.

How To Replace Repair A Leaky Moen Cartridge In Bathroom Set Of Faucets Single Lever Tips

How To Remove Moen Bathroom Faucet Handle In 2 Steps

How To Fix A Dripping Moen Faucet Howtolou Com

Bathroom Faucet Cartridge Replacement

How Do I Replace My Moen Bathroom Faucet Cartridge

Moen Faucet Stuck How To Remove A Monticello Tools For Removing Bathroom Facuet

Easy Moen Bathroom Faucet Drip Repair

How To Repair Remove Replace A Leaking Moen Shower Faucet Cartridge Valve With Single Knob 1225

Moen Circa 2008 Kitchen Faucet Removal

How To Repair Moen Bathroom Faucet Dripping Water Cartridge Removal Replace Single Lever
Related Posts