Replacing a Shut-Off Valve in a Bathroom Sink
The shut-off valve, a crucial component of your bathroom sink, allows you to control water flow to the fixture. If yours is leaking or malfunctioning, prompt replacement is essential. This article highlights the essential aspects of replacing a shut-off valve in a bathroom sink, ensuring a smooth and effective repair.
Safety First
Before starting any plumbing work, turn off the main water supply to prevent unexpected water flow. Additionally, wear safety goggles and gloves for protection. If you are unfamiliar with plumbing, consider seeking assistance from a qualified plumber for safe and reliable results.
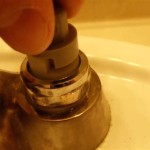
Identifying the Type of Valve
Shut-off valves come in various types, including compression valves, gate valves, and ball valves. To determine the type installed in your bathroom sink, examine its design. Compression valves have a packing nut and a handle that turns clockwise or counterclockwise to open or close. Gate valves have a handle that lifts or lowers a gate to control water flow. Ball valves use a ball-shaped component to turn water on or off with a quarter-turn handle.
Tools and Materials
Gather the necessary tools and materials before starting the replacement process. You will need an adjustable wrench, a pair of pliers, a screwdriver (if required), replacement shut-off valves, and Teflon tape. Ensure that the replacement valves match the type and size of the old valves.
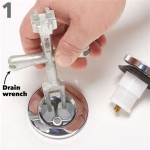
Removing the Old Valve
Using the adjustable wrench, carefully loosen the packing nut or bonnet nut of the old valve. Grip the valve body with pliers and unscrew it counterclockwise. If the valve is stubborn, apply penetrating oil to loosen it.
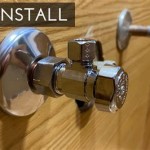
Installing the New Valve
Apply several layers of Teflon tape to the threads of the new shut-off valve. Screw the valve into the water supply line by hand, then tighten it with the adjustable wrench. Ensure that it is snug but avoid overtightening.
Testing the New Valve
Turn the main water supply back on and open the bathroom sink faucet. Observe if there are any leaks around the new shut-off valve. If a leak persists, tighten the packing nut or bonnet nut slightly. Repeated tightening may be necessary until the leak stops.
Conclusion
Replacing a shut-off valve in a bathroom sink is a relatively simple task that can be completed in a few steps. By understanding the essential aspects covered in this article, you can effectively repair and maintain your bathroom plumbing, ensuring reliable water flow and preventing costly leaks.

How To Replace A Leaking Shutoff Valve Under Sink

How To Install Water Shut Off Valve For Sinks

How To Replace Shutoff Valve Under Bathroom Sink

How To Remove Install A Leaky New Shut Off Valve Compression Soldered Or Push Fit Got2learn

How To Replace A Shutoff Valve Diy Family Handyman

How To Replace A Shut Off Valve Under Your Sink

How To Install A New Bathroom Water Supply Shutoff Valve

Replace Bathroom Sink Shut Off Valve

How To Replace A Flowtite Push Pull Valve With Standard Shut Off For Dishwasher

How To Replace Shut Off Valve On Cpvc Pipe Замена крана на пвх трубе
Related Posts