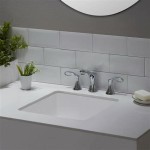
How to Resurface Your Bathroom Countertop
Bathroom countertops are a focal point of any bathroom and can greatly impact its overall design and functionality. If your current countertop is looking worn, dated, or damaged, resurfacing it can be a great way to give your bathroom a fresh, new look without the expense of a complete renovation.
Resurfacing a bathroom countertop involves applying a new layer of material over the existing surface. This can be done using a variety of materials, including epoxy, acrylic, and laminate. The type of material you choose will depend on your budget, desired look, and the condition of your existing countertop.
Here is a step-by-step guide on how to resurface your bathroom countertop:
Step 1: Prepare the Countertop
The first step is to prepare the countertop for resurfacing. This involves cleaning the surface thoroughly with a degreaser and sanding it lightly to create a smooth and even surface. If there are any cracks or chips in the countertop, you will need to repair them before resurfacing.
Step 2: Choose a Resurfacing Material
Once the countertop is prepared, you will need to choose a resurfacing material. As mentioned earlier, there are a variety of materials available, including epoxy, acrylic, and laminate. Epoxy is a durable and long-lasting material that can be applied to both new and old countertops. Acrylic is a more affordable option that is available in a wide range of colors and patterns. Laminate is a thin layer of plastic that is glued to the countertop. It is a good option for countertops that are in good condition and only need a cosmetic update.
Step 3: Apply the Resurfacing Material
The next step is to apply the resurfacing material to the countertop. The application method will vary depending on the material you choose. For epoxy, you will need to mix the two parts of the epoxy together and then apply it to the countertop using a trowel or roller. For acrylic, you will need to spread the acrylic over the countertop and then use a squeegee to smooth it out. For laminate, you will need to apply a layer of glue to the back of the laminate and then press it onto the countertop.
Step 4: Allow the Resurfacing Material to Cure
Once the resurfacing material has been applied, you will need to allow it to cure. The curing time will vary depending on the material you choose. For epoxy, the curing time is typically 24-48 hours. For acrylic, the curing time is typically 12-24 hours. For laminate, the curing time is typically 24 hours.
Step 5: Finishing Touches
Once the resurfacing material has cured, you can add any finishing touches, such as a sealant or backsplash. A sealant will help to protect the countertop from stains and scratches. A backsplash will help to add a touch of style and protect the wall behind the countertop from water damage.
Resurfacing your bathroom countertop is a relatively simple and inexpensive way to give your bathroom a fresh, new look. By following the steps outlined above, you can achieve professional-looking results that will last for years to come.

How To Refinish Bathroom Countertops Domestic

How To Refinish Bathroom Vanity Top With Diy Resin Thediyplan

Bathroom Countertop Redrock Resurfacing

How To Resurface An Acrylic Bathroom Counter Top Hometalk

Paint Bathroom Vanity Countertop Sink So Easy A Piece Of Rainbow

Bathroom Countertop Refinishing A Budget Friendly Update

How To Refinish Laminate Counters Made By Marzipan

How To Easily Spray Paint Bathroom Countertops My Homier Home

Paint Bathroom Vanity Countertop Sink So Easy A Piece Of Rainbow

Diy Countertop Refinishing Tips And Tricks To Renew The Counter Surface
Related Posts