How To Stop A Leak In The Bathroom Sink
A leaking bathroom sink is a common problem that can be easily fixed with a few simple tools. By following these steps, you can stop the leak and get your sink back in working order in no time.
1. Identify the source of the leak
The first step is to identify the source of the leak. This can be done by looking for water stains or drips around the sink. Once you have found the source of the leak, you can proceed to the next step.
2. Turn off the water supply
Once you have identified the source of the leak, you need to turn off the water supply to the sink. This can be done by turning the shut-off valves under the sink. If you do not have shut-off valves, you will need to turn off the main water supply to your house.
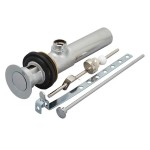
3. Remove the drain stopper
If the leak is coming from the drain, you will need to remove the drain stopper. This can be done by unscrewing the stopper or by using a pair of pliers to pull it out.
4. Clean the drain
Once you have removed the drain stopper, you need to clean the drain. This can be done by using a drain cleaner or by pouring a cup of baking soda down the drain followed by a cup of vinegar. Let the solution sit for a few minutes, then flush the drain with hot water.
5. Replace the drain stopper
Once you have cleaned the drain, you need to replace the drain stopper. Make sure that the stopper is properly seated in the drain hole. If the stopper is not properly seated, it will leak.
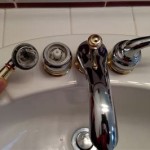
6. Tighten the nuts under the sink
If the leak is coming from the nuts under the sink, you will need to tighten them. This can be done using a wrench or pliers. Make sure that the nuts are tightened securely, but do not overtighten them.
7. Replace the washers
If the leak is coming from the washers, you will need to replace them. Washers are small, rubber gaskets that seal the connection between the faucet and the sink. To replace the washers, you will need to remove the faucet handle and then unscrew the faucet nut. Once the faucet nut is removed, you will be able to replace the washers.
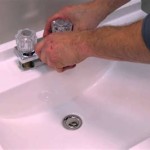
8. Reinstall the faucet handle
Once you have replaced the washers, you need to reinstall the faucet handle. Make sure that the handle is properly seated and that it is tightened securely.
9. Turn on the water supply
Once you have replaced the washers and reinstalled the faucet handle, you can turn on the water supply. Check for leaks and make sure that the sink is working properly.
By following these steps, you can stop a leak in the bathroom sink and get your sink back in working order in no time.

How To Fix A Leaking Bathroom Sink Paschal Air Plumbing Electric

Bathroom Sink Drain Leaking Around Threads Premier Plumbing Inc

How To Fix A Leaking Bathroom Sink Paschal Air Plumbing Electric

Common Sink Leaks You Could Probably Fix Yourself

Bathroom Sink Drain Leaking Around Threads Premier Plumbing Inc

The Do S And Don Ts Of Dealing With A Bathroom Sink Or Shower Leak

Fixing A Leaking Bathroom Sink Drain Clover Services

How To Fix A Leaky Sink Drain Stopper Plug Easy Do

Bathroom Sink Drain Leak Not Sure How To Fix Doityourself Com Community Forums

Best Ways To Clean Your Bathroom Sink Drain Yourself