How To Tighten Loose Bathroom Faucet
A loose bathroom faucet can be a nuisance, causing drips, leaks, and wobbly handles. Fortunately, tightening a loose bathroom faucet is a relatively simple task that can be completed in just a few minutes with the right tools and a little know-how.
Tools and Materials:
- Adjustable wrench or Allen wrench (if necessary)
- Plumber's tape (optional)
Step-by-Step Instructions:
1. Turn off the water supply:Locate the shut-off valves under the sink and turn them clockwise to stop the flow of water to the faucet.
2. Remove the aerator (optional):If your faucet has an aerator, use a wrench to unscrew it from the end of the spout. This will give you better access to the faucet's base.
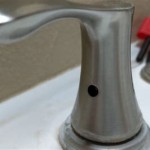
3. Tighten the packing nut:Use an adjustable wrench to tighten the packing nut, which is located at the base of the faucet handle. Turn the nut clockwise until the handle is snug but not overly tight.
If the packing nut is damaged or worn, you may need to replace it. To do this, unscrew the old nut completely and wrap a few layers of plumber's tape around the threads of the new nut before tightening it.
4. Tighten the mounting bolts:Locate the mounting bolts that secure the faucet to the sink. Use an Allen wrench or adjustable wrench to tighten them until the faucet is firmly secured.
5. Reattach the aerator (if removed):If you removed the aerator in step 2, screw it back onto the end of the spout by hand until it is snug.
6. Turn on the water supply:Slowly turn the shut-off valves under the sink counterclockwise to restore the water supply to the faucet. Check for any leaks around the base of the faucet or the handle.
7. Adjust the handle tightness (if necessary):If the faucet handle is still slightly loose, use the adjustable wrench to tighten the handle screw located at the base of the handle.
Tips:
- Apply a small amount of WD-40 or plumber's grease to the threads of the packing nut and mounting bolts before tightening to prevent future corrosion.
- If the faucet is still leaking or wobbly after following these steps, you may need to replace the O-rings or other internal parts. Consult a plumber for assistance.
- Regular maintenance of your bathroom faucets can help prevent them from becoming loose or leaky.
Conclusion:
By following these simple steps, you can easily tighten a loose bathroom faucet and restore it to proper working order. Remember to turn off the water supply before starting any repairs and to take precautions to prevent further damage to the faucet or plumbing system.

How To Fix Loose Sink Faucet

How To Tighten Faucet Handle Homeserve Usa

Tighten A Loose Lever On Moen Brantford Faucet

How To Tighten A Bathroom Faucet Handle

How To Tighten A Loose Bathroom Faucet

Sbw 8 A Loose Bathroom Faucet Handle

How To Fix A Loose Faucet Storables

How To Tighten A Loose Delta Bathroom Sink Faucet Spout Handles 5 22 18

Bathroom Faucet Handles Loose Wobbly Diy Fix

Fixed How To Tighten A Loose Kitchen Faucet Base
Related Posts