How To Tighten Moen Bathroom Sink Handle
Maintaining the functionality of bathroom fixtures is essential for a comfortable and efficient living space. Moen bathroom sink handles, known for their durability and reliability, may occasionally require tightening due to regular use. Understanding the essential aspects of how to tighten a Moen bathroom sink handle empowers homeowners and renters to address this common issue effectively, ensuring a well-maintained bathroom.
This comprehensive guide will delve into the crucial aspects of tightening a Moen bathroom sink handle, providing step-by-step instructions and highlighting the importance of each step. By following these steps, individuals can confidently perform this simple maintenance task, saving time and the potential cost of professional assistance.
Gather Necessary Tools
Before embarking on the task of tightening a Moen bathroom sink handle, it is essential to assemble the necessary tools. These include a pair of pliers, an adjustable wrench, and a screwdriver. Having these tools readily available will streamline the process and prevent interruptions due to missing tools.
Identify Handle Type
Moen bathroom sink handles come in various types, including lever handles and cross handles. Correctly identifying the type of handle is crucial as it determines the specific steps involved in tightening the handle.
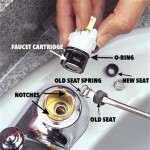
Remove Handle Cover
Depending on the handle type, there may be a small cover or cap that needs to be removed to access the tightening screw. Using pliers or a screwdriver, gently pry off the cover, taking care not to damage it.
Locate Tightening Screw
Once the handle cover is removed, the tightening screw will be visible. This screw is typically located at the base of the handle, where it connects to the faucet body.
Tighten the Screw
Using an adjustable wrench or pliers, carefully tighten the screw clockwise. Avoid overtightening, as this can damage the handle or faucet. Tighten the screw just enough to secure the handle firmly.
Reattach Handle Cover
Once the screw is tightened, reattach the handle cover or cap by gently pressing it back into place. Ensure that the cover fits snugly and securely.
Test Functionality
After completing the tightening process, test the functionality of the handle by turning it on and off several times. The handle should operate smoothly and without any leaks or wobbles.
By following these steps and paying attention to the essential aspects of tightening a Moen bathroom sink handle, individuals can effectively maintain their bathroom fixtures, ensuring a comfortable and trouble-free experience.

Tighten A Loose Lever On Moen Brantford Faucet

Moen Faucet Handle Keeps Twisting Out Of Position

Moen 4570 Handle Fell Off But Then I Fixed It Here S How

How To Tighten Faucet Handle Homeserve Usa

How To Remove Moen Bathroom Faucet Handle In 2 Steps

How To Tighten Moen Bathroom Faucet Handle Bargain

How To Fix A Faucet Tighten Kitchen Sink Handle

How To Tighten An Old Moen Kitchen Sink Faucet Where The Base Is Loose And Wiggles Around Thinkbox

Moen Brantford 4 In Centerset 2 Handle Low Arc Bathroom Faucet Brushed Nickel With Metal Drain Assembly 6610bn The Home Depot

Moen Faucet Handle Keeps Twisting Out Of Position
Related Posts