How to Use Chalk Paint on Bathroom Vanity
Essential Aspects
Transforming a bathroom vanity with chalk paint requires careful execution. Understanding the fundamental aspects of this process ensures a successful outcome. These include surface preparation, paint selection, painting techniques, finishing touches, and maintenance.
To begin, the vanity surface must be thoroughly cleaned and sanded, removing dirt, grime, and any imperfections. Choosing the appropriate chalk paint color and finish is vital, as it will determine the final aesthetic. Careful brushwork is essential to achieve an even and smooth finish, while avoiding drips or brush marks.
After painting, sealing the surface with a topcoat or wax protects it from damage and enhances its durability. Regular cleaning and maintenance practices help prolong the beauty of the painted vanity and preserve its aesthetic appeal.
Surface Preparation
Proper surface preparation ensures paint adhesion and a flawless finish. Begin by thoroughly cleaning the vanity with a degreasing agent to remove any dirt or oil. Sand the surface lightly using fine-grit sandpaper to create a slightly roughened texture that the paint will adhere to.
Once sanded, vacuum or wipe away any dust particles to ensure a clean surface for painting.
Choosing Chalk Paint and Finish
Selecting the right chalk paint color and finish is crucial for the desired aesthetic. Chalk paint comes in a wide range of colors, allowing for customization and personal style.
For a matte finish, a clear protective wax or topcoat is recommended. For a more durable and glossy finish, a polyurethane topcoat is ideal. The choice depends on the desired look and level of protection required.
Painting Techniques
Apply chalk paint in thin, even layers with a high-quality brush. Use light, consistent strokes to avoid brush marks or drips. Allow each layer to dry completely before applying the next.
For a distressed look, sand lightly between coats or use a damp sponge to remove some of the paint. This creates a weathered or aged effect.
Finishing Touches
Once the final coat of paint is dry, seal the surface with a protective topcoat. This protects the paint from moisture, wear, and tear. Choose a topcoat that is compatible with the chalk paint and the desired finish.
Apply the topcoat in thin layers, allowing each layer to dry completely. This creates a durable and protective finish that enhances the longevity of the painted vanity.
Maintenance
To maintain the beauty of a chalk-painted vanity, regular cleaning and touch-ups may be necessary. Use a damp cloth and mild soap to remove dirt or stains.
If scratches or chips occur, touch up the area using the same chalk paint and topcoat. This will restore the vanity's finish and extend its lifespan.

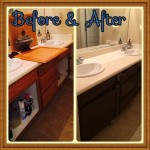
Bathroom Vanity Makeover With Chalk Paint Decor Adventures

Bathroom Vanity Makeover With Chalk Paint Decor Adventures

Chalk Painted Bathroom Vanity Makeover Our Storied Home

Blue Diy Chalk Paint Bathroom Vanity Makeover Abbotts At Home

Chalk Paint Bathroom Vanity Makeover Remodelaholic

Bathroom Vanity Makeover With Chalk Paint Decor Adventures

How To Paint Cabinets With Chalk

Blue Diy Chalk Paint Bathroom Vanity Makeover Abbotts At Home

Chalk Paint Cabinets Bathroom Renovation

How To Completely Change Bathroom Cabinets With Paint Roots Wings Furniture Llc